 wehub-resource-sync
54 KiB
Note
本文档由 WeHub 基于上游 README 翻译整理,属于社区翻译,非官方中文文档。
English · 原始项目 · 上游 README
原作者、版权与许可证归属以原始项目及本仓库 LICENSE 文件为准。

其他语言版本
🇺🇸 English | 🇨🇳 简体中文 | 🇯🇵 日本語 | 🇰🇷 한국어 | 🇩🇪 Deutsch | 🇫🇷 Français | 🇪🇸 Español | 🇮🇳 हिन्दी | 🇧🇷 Português | 🇷🇺 Русский | 🇸🇦 العربية | 🇮🇷 فارسی | 🇮🇹 Italiano | 🇵🇱 Polski | 🇳🇱 Nederlands | 🇹🇷 Türkçe | 🇺🇦 Українська | 🇻🇳 Tiếng Việt | 🇮🇩 Bahasa Indonesia | 🇸🇪 Svenska | 🇬🇷 Ελληνικά | 🇷🇴 Română | 🇨🇿 Čeština | 🇫🇮 Suomi | 🇩🇰 Dansk | 🇳🇴 Norsk | 🇭🇺 Magyar | 🇹🇭 ภาษาไทย | 🇺🇿 Oʻzbekcha | 🇹🇼 繁體中文 | 🇵🇭 Filipino | 🇮🇱 עברית




在 AI 编程助手中输入 /graphify,即可将整个项目(代码、文档、PDF、图片、视频)映射为可查询的知识图谱(knowledge graph),无需再在文件中 grep 搜索。
- 代码映射免费且完全本地运行。 代码通过 tree-sitter AST 解析:确定性、无需 LLM、数据不离开你的机器。(文档、PDF、图片和视频会使用助手的模型或已配置的 API 密钥进行语义分析。)
- 每条边都有说明。 每个连接都会标注
EXTRACTED(源码中显式声明)或INFERRED(由 graphify 解析得出),因此你可以区分哪些是直接读取的、哪些是推断得出的。 - 不是向量索引。 不使用嵌入(embeddings)、也不使用向量存储:这是一个可遍历的真实图。你可以提问、追踪两个事物之间的路径,或解释某个概念。
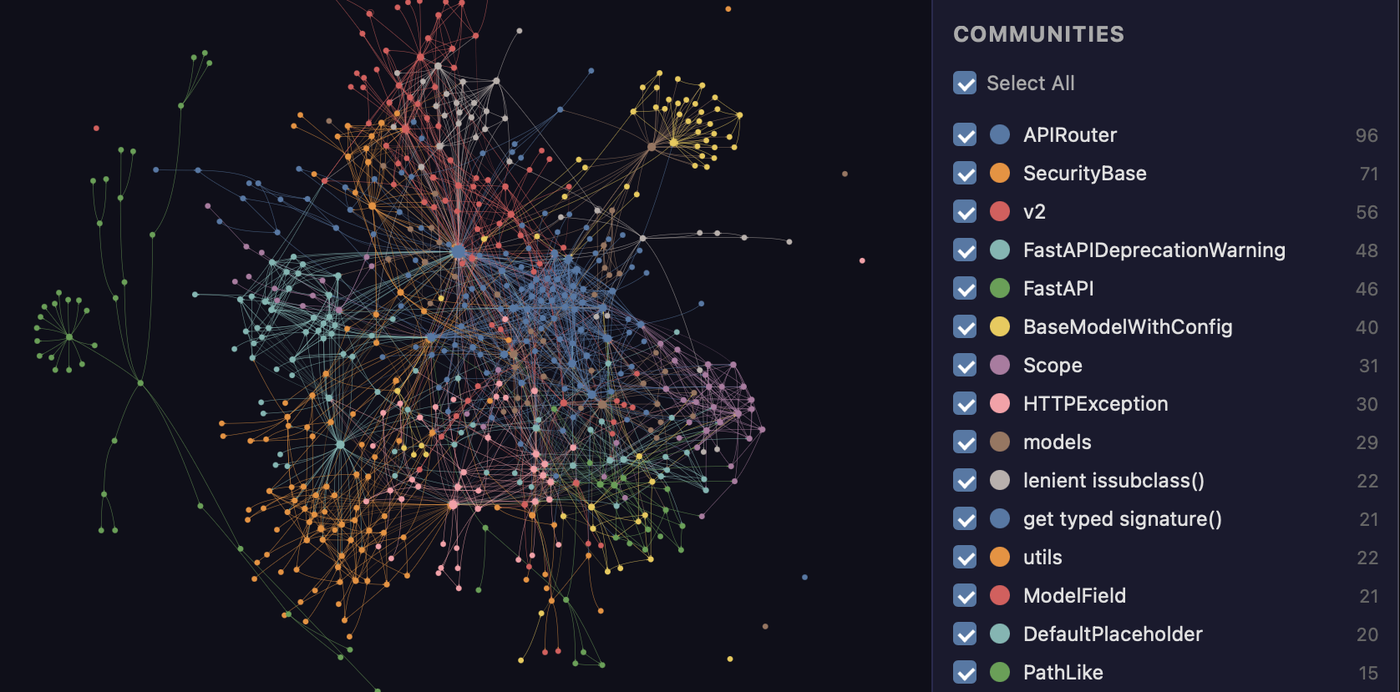
由 graphify 映射的 FastAPI 代码库。每个节点代表一个概念,颜色表示检测到的社区,整个图谱可在 graph.html 中点击交互。
快速开始(30 秒):
uv tool install graphifyy      # install the CLI (or: pipx install graphifyy)
graphify install               # register the skill with your AI assistant
然后,在你的 AI 助手中:
/graphify .
就这么简单。你会得到 三个文件:
graphify-out/
├── graph.html       open in any browser — click nodes, filter, search
├── GRAPH_REPORT.md  the highlights: key concepts, surprising connections, suggested questions
└── graph.json       the full graph — query it anytime without re-reading your files
适用于 Claude Code、Cursor、Codex、Gemini CLI、GitHub Copilot 等 15+ 平台 — 选择你的平台。
实际效果
图谱构建完成后,你可以直接查询它,而无需逐个阅读文件。以下为真实输出,展示在上述 FastAPI 代码库上运行的 graphify:
$ graphify explain "APIRouter"
Node: APIRouter
  Source:    routing.py L2210
  Community: 2
  Degree:    47

Connections (47):
  --> RequestValidationError [uses] [INFERRED]
  --> Dependant [uses] [INFERRED]
  --> .get() [method] [EXTRACTED]
  <-- __init__.py [imports] [EXTRACTED]
  ...

$ graphify path "FastAPI" "ModelField"
Shortest path (3 hops):
  FastAPI --uses--> DefaultPlaceholder <--references-- get_request_handler() --references--> ModelField
每条边都带有置信度标签(EXTRACTED = 源码中显式声明,INFERRED = 通过解析推导得出),因此你可以区分哪些是直接读取的、哪些是推断得出的。graphify query "<question>" 会针对自然语言问题返回限定范围的子图,graphify path A B 可追踪任意两个事物之间的连接方式。
功能概览
开箱即用,你将获得:
| 能力 | 你将获得 |
|---|---|
| God nodes | 连接最多的概念,便于看清一切流经何处 |
| Communities | 图谱按子系统划分(Leiden),并附带无需 LLM 的标签 |
| 跨文件链接 | 通过 tree-sitter AST 在约 40 种语言中解析 calls / imports / inherits / mixes_in |
| 查询、路径、解释 | 提问、追踪两个事物之间的路径,或解释某个概念,全部基于 graph.json |
| 理由说明 + 文档引用 | # NOTE: / # WHY: 注释以及 ADR/RFC 引用会成为与代码关联的一等节点 |
| 超越代码 | 文档、PDF、图片以及音视频都会映射到同一张图谱中 |
| 本地优先 | 代码在本地通过 tree-sitter 解析(无需 LLM,数据不离开你的机器);仅对文档/媒体的语义分析会调用后端,且仅在你完成配置时才会调用 |
基准测试
| 基准测试 | 指标 | graphify | 对比 |
|---|---|---|---|
| LOCOMO (n=300) | recall@10 | 0.497 | mem0 0.048,supermemory 0.149 |
| LOCOMO (n=300) | QA 准确率 | 45.3% | supermemory 49.7%,mem0 27.3% |
| LongMemEval-S (n=50) | QA 准确率 | 76% | 与 dense RAG 持平 |
| 图谱构建 | LLM 额度 | 0 | 大多数系统按 token 计费 |
所有系统均在同一测试框架、同一模型和预算下运行,并由评审员打分,评审结果经第二位评审员盲测验证(一致率 90.6%,Cohen's kappa 0.81)。完整的各系统对比表、代码智能(code-intelligence)结果及复现命令:BENCHMARKS.md。
前置要求
| 要求 | 最低版本 | 检查 | 安装 |
|---|---|---|---|
| Python | 3.10+ | python --version |
python.org |
| uv (推荐) | any | uv --version |
curl -LsSf https://astral.sh/uv/install.sh | sh |
| pipx (备选) | any | pipx --version |
pip install pipx |
macOS 快速安装(Homebrew):
brew install python@3.12 uv
Windows 快速安装:
winget install astral-sh.uv
Ubuntu/Debian:
sudo apt install python3.12 python3-pip pipx
# or install uv:
curl -LsSf https://astral.sh/uv/install.sh | sh
安装
官方包: PyPI 上的官方包为
graphifyy(双 y)。PyPI 上其他graphify*包与此无关。CLI 命令仍为graphify。
步骤 1 — 安装软件包:
# Recommended (isolated env; if 'graphify' isn't found after, run: uv tool update-shell):
uv tool install graphifyy

# Alternatives:
pipx install graphifyy
pip install graphifyy  # may need PATH setup — see note below
步骤 2 — 向你的 AI 助手注册该 skill:
graphify install
就这么简单。打开 AI 助手并输入 /graphify .
若要将 assistant skill 安装到当前仓库而非用户配置目录,请添加 --project:
graphify install --project
graphify install --project --platform codex
项目级安装会写入当前目录,例如 .claude/skills/graphify/SKILL.md 或 .agents/skills/graphify/SKILL.md(另有一个 references/ 旁载文件供 skill 按需加载),并会打印 git add 提示,说明哪些文件可以提交。支持项目级安装的各平台命令接受相同标志,例如 graphify claude install --project 或 graphify codex install --project。
PowerShell 说明: 请使用
graphify .,不要使用/graphify .—— 前导斜杠在 PowerShell 中是路径分隔符。
graphify: command not found?uv tool install/pipx install会将graphify命令放入其工具 bin 目录(~/.local/bin)。若安装后 shell 找不到该命令 —— 在全新的 macOS + zsh 环境中很常见 —— 说明该目录尚未加入PATH:运行uv tool update-shell(或pipx ensurepath),然后打开新终端。若使用普通pip,请将~/.local/bin(Linux)或~/Library/Python/3.x/bin(Mac)加入 PATH,或运行python -m graphify。
使用
uvx/uv tool run运行而不安装? 应写包名,而非命令名:uvx --from graphifyy graphify install。直接使用uvx graphify …会失败(No solution found … no versions of graphify),因为uv tool run将第一个单词视为包名,而包名是graphifyy——graphify命令位于该包内部。
尽量在 Mac/Windows 上避免使用
pip install。 skill 会在运行时从graphify-out/.graphify_python解析 Python;若该路径指向的环境与pip安装包的环境不同,就会出现ModuleNotFoundError: No module named 'graphify'。uv tool install和pipx install会将包隔离在各自环境中,可完全避免此问题。
Git hooks 与 uv tool / pipx:
graphify hook install会在安装时把当前解释器路径直接嵌入 hook 脚本,因此即使在使用 GUI git 客户端和 CI runner 且~/.local/bin不在 PATH 上的情况下,post-commit hook 也能正确触发。若你重新安装或升级 graphify,请重新运行graphify hook install以刷新嵌入路径。
选择你的平台(20+ 款助手,点击展开)
| 平台 | 安装命令 |
|---|---|
| Claude Code (Linux/Mac) | graphify install |
| Claude Code (Windows) | graphify install(自动检测)或 graphify install --platform windows |
| CodeBuddy | graphify install --platform codebuddy |
| Codex | graphify install --platform codex |
| OpenCode | graphify install --platform opencode |
| Kilo Code | graphify install --platform kilo |
| GitHub Copilot CLI | graphify install --platform copilot |
| VS Code Copilot Chat | graphify vscode install |
| Aider | graphify install --platform aider |
| OpenClaw | graphify install --platform claw |
| Factory Droid | graphify install --platform droid |
| Trae | graphify install --platform trae |
| Trae CN | graphify install --platform trae-cn |
| Gemini CLI | graphify install --platform gemini |
| Hermes | graphify install --platform hermes |
| Kimi Code | graphify install --platform kimi |
| Amp | graphify amp install |
| Agent Skills (cross-framework) | graphify install --platform agents(别名 --platform skills) |
| Kiro IDE/CLI | graphify kiro install |
| Pi coding agent | graphify install --platform pi |
| Cursor | graphify cursor install |
| Devin CLI | graphify devin install |
| Google Antigravity | graphify antigravity install |
Codex 用户还需要在 ~/.codex/config.toml 的 [features] 下配置 multi_agent = true 以支持并行提取。CodeBuddy 使用与 Claude Code 相同的 Agent 工具和 PreToolUse hook 机制。Factory Droid 使用 Task 工具进行并行子代理调度。OpenClaw 和 Aider 使用顺序提取(这些平台上的并行 agent 支持仍处于早期阶段)。Trae 使用 Agent 工具进行并行子代理调度,且不支持 PreToolUse hooks,因此 AGENTS.md 是始终生效的机制。
--platform agents(别名 --platform skills)面向通用跨框架 Agent-Skills 位置:全局安装使用规范的用户全局 ~/.agents/skills/(由 npx skills 及符合规范的框架读取),项目(--project)安装使用 ./.agents/skills/。裸 graphify install 命令按设计保持单平台(Claude Code)—— 若希望 skill 可被任何读取 .agents/skills 的框架发现,请使用具名的 agents 平台。
Codex 使用
$graphify,而非/graphify。
可选扩展(按需安装)
| 扩展 | 功能 | 安装 |
|---|---|---|
pdf |
PDF 提取 | uv tool install "graphifyy[pdf]" |
office |
.docx 与 .xlsx 支持 |
uv tool install "graphifyy[office]" |
google |
Google Sheets 渲染 | uv tool install "graphifyy[google]" |
video |
视频/音频转写(faster-whisper + yt-dlp) | uv tool install "graphifyy[video]" |
mcp |
MCP stdio server | uv tool install "graphifyy[mcp]" |
neo4j |
Neo4j push 支持 | uv tool install "graphifyy[neo4j]" |
falkordb |
FalkorDB push 支持 | uv tool install "graphifyy[falkordb]" |
svg |
SVG 图导出 | uv tool install "graphifyy[svg]" |
leiden |
Leiden 社区检测(仅 Python < 3.13) | uv tool install "graphifyy[leiden]" |
ollama |
Ollama 本地推理 | uv tool install "graphifyy[ollama]" |
openai |
OpenAI / OpenAI 兼容 API | uv tool install "graphifyy[openai]" |
gemini |
Google Gemini API | uv tool install "graphifyy[gemini]" |
anthropic |
Anthropic Claude API(--backend claude,使用 ANTHROPIC_API_KEY) |
uv tool install "graphifyy[anthropic]" |
bedrock |
AWS Bedrock(使用 IAM,无需 API key) | uv tool install "graphifyy[bedrock]" |
azure |
Azure OpenAI Service(--backend azure,使用 AZURE_OPENAI_API_KEY + AZURE_OPENAI_ENDPOINT) |
uv tool install "graphifyy[openai]" |
sql |
SQL schema 提取 | uv tool install "graphifyy[sql]" |
postgres |
实时 PostgreSQL 内省(--postgres DSN) |
uv tool install "graphifyy[postgres]" |
dm |
BYOND DreamMaker .dm/.dme AST 提取(若当前平台没有匹配的 wheel,可能需要 C 编译器 + python3-dev) |
uv tool install "graphifyy[dm]" |
terraform |
Terraform / HCL .tf/.tfvars/.hcl AST 提取 |
uv tool install "graphifyy[terraform]" |
pascal |
Pascal / Delphi .pas/.dpr/.dpk/.inc AST 提取(更精确的 calls/inherits 边;缺失时回退到 regex 提取器) |
uv tool install "graphifyy[pascal]" |
chinese |
中文查询分词(jieba) | uv tool install "graphifyy[chinese]" |
all |
以上全部 | uv tool install "graphifyy[all]" |
让你的助手始终使用图谱
在构建图谱后,在项目中运行一次:
| 平台 | 命令 |
|---|---|
| Claude Code | graphify claude install |
| CodeBuddy | graphify codebuddy install |
| Codex | graphify codex install |
| OpenCode | graphify opencode install |
| Kilo Code | graphify kilo install |
| GitHub Copilot CLI | graphify copilot install |
| VS Code Copilot Chat | graphify vscode install |
| Aider | graphify aider install |
| OpenClaw | graphify claw install |
| Factory Droid | graphify droid install |
| Trae | graphify trae install |
| Trae CN | graphify trae-cn install |
| Cursor | graphify cursor install |
| Gemini CLI | graphify gemini install |
| Hermes | graphify hermes install |
| Kimi Code | graphify install --platform kimi |
| Amp | graphify amp install |
| Agent Skills(跨框架) | graphify agents install (alias graphify skills install) |
| Kiro IDE/CLI | graphify kiro install |
| Pi coding agent | graphify pi install |
| Devin CLI | graphify devin install |
| Google Antigravity | graphify antigravity install |
这会写入一个小型配置文件,指示你的助手在回答代码库相关问题时查阅知识图谱,优先使用像 graphify query "<question>" 这样的范围化查询,而不是阅读完整报告或直接 grep 原始文件。
- Hook 平台(Claude Code、Gemini CLI):在搜索类工具调用之前会自动触发 hook(在 Claude Code 上还会在通过 Read/Glob 工具逐个读取源文件之前触发),引导你的助手走图谱路径。
- 指令文件平台(Codex、OpenCode、Cursor 等):持久化指令文件(
AGENTS.md、.cursor/rules/等)提供相同的“先查询”引导。
GRAPH_REPORT.md 仍可用于广泛的架构审查。
CodeBuddy 与 Claude Code 做同样两件事:写入 CODEBUDDY.md 节,告诉 CodeBuddy 在回答架构问题前先读 graphify-out/GRAPH_REPORT.md;并安装 PreToolUse hooks(.codebuddy/settings.json),在 Bash 搜索命令和文件读取之前触发,引导使用 graphify query。
Codex 写入 AGENTS.md,并在 .codex/hooks.json 中安装 PreToolUse hook,在每次 Bash 工具调用之前触发,与 Claude Code 相同的始终开启机制。
Kilo Code 将 Graphify skill 安装到 ~/.config/kilo/skills/graphify/SKILL.md,并将原生 /graphify 命令安装到 ~/.config/kilo/command/graphify.md。graphify kilo install 还会写入 AGENTS.md,以及原生 tool.execute.before 插件(.kilo/plugins/graphify.js + .kilo/kilo.json 或 .kilo/kilo.jsonc 注册),这样 Kilo 可通过原生 .kilo 配置获得相同的始终开启的图谱提醒行为。
Cursor 写入带有 alwaysApply: true 的 .cursor/rules/graphify.mdc,因此 Cursor 会在每次对话中自动包含它,无需 hook。
要一次性从所有平台移除 graphify:graphify uninstall(添加 --purge 可同时删除 graphify-out/)。或使用各平台专属命令(例如 graphify claude uninstall)。
报告包含什么
- God 节点 — 项目中连接最多的概念,一切流经这些节点。
- 意外连接 — 位于不同文件或模块中的事物之间的链接,按意外程度排序。
- “原因”(why) — 行内注释(
# NOTE:、# WHY:、# HACK:)、文档字符串以及文档中的设计理由会被提取为独立节点,并链接到它们所解释的代码。 - 建议问题 — 4–5 个图谱最能独特回答的问题。
- 置信度标签 — 每个推断关系均标记为
EXTRACTED、INFERRED或AMBIGUOUS。你始终能区分哪些是发现的、哪些是推测的。
支持哪些文件
| 类型 | 扩展名 |
|---|---|
| 代码(36 种 tree-sitter 语法) | .py .ts .mts .cts .js .jsx .tsx .mjs .go .rs .java .c .cpp .cc .cxx .h .hpp .cu .cuh .metal .rb .cs .kt .kts .scala .php .swift .lua .luau .toc .zig .ps1 .psm1 .psd1 .ex .exs .m .mm .jl .vue .svelte .astro .groovy .gradle .dart .v .sv .svh .sql .f .f90 .f95 .f03 .f08 .pas .pp .dpr .dpk .lpr .inc .dfm .lfm .lpk .sh .bash .json .dm .dme .dmi .dmm .dmf .sln .slnx .csproj .fsproj .vbproj .xaml .razor .cshtml (.dm/.dme requires uv tool install graphifyy[dm]; .mts/.cts reuse the TypeScript grammar, .cc/.cxx and CUDA .cu/.cuh and Metal .metal reuse the C++ grammar) |
| Salesforce Apex | .cls .trigger (regex-based; classes, interfaces, enums, methods, triggers, SOQL/DML edges) |
| Terraform / HCL | .tf .tfvars .hcl (requires uv tool install graphifyy[terraform]) |
| MCP 配置 | .mcp.json mcp.json mcp_servers.json claude_desktop_config.json — extracts server nodes, package refs, env var requirements |
| 包清单 | apm.yml pyproject.toml go.mod pom.xml — one canonical package node per package (by name) plus depends_on edges, so a package referenced from many manifests is a single hub |
| 文档 | .md .mdx .qmd .html .txt .rst .yaml .yml (markdown [text](./other.md) links and [[wikilinks]] become references edges between docs) |
| Office | .docx .xlsx (requires uv tool install graphifyy[office]) |
| Google Workspace | .gdoc .gsheet .gslides (opt-in; requires gws auth and --google-workspace; Sheets need uv tool install graphifyy[google]) |
.pdf |
|
| 图片 | .png .jpg .webp .gif |
| 视频 / 音频 | .mp4 .mov .mp3 .wav and more (requires uv tool install graphifyy[video]) |
| YouTube / URL | any video URL (requires uv tool install graphifyy[video]) |
代码在本地提取,无需 API 调用(通过 tree-sitter 的 AST)。其余内容均通过你的 AI 助手模型 API 处理。
桌面版 Google Drive 的 .gdoc、.gsheet 和 .gslides 文件是快捷方式
指针,而非文档内容。若要在无头提取中包含原生 Google Docs、Sheets 和 Slides,
请安装并认证
gws CLI,),然后运行:
uv tool install "graphifyy[google]"  # needed for Google Sheets table rendering
gws auth login -s drive
graphify extract ./docs --google-workspace
你也可以设置 GRAPHIFY_GOOGLE_WORKSPACE=1。Graphify 会将快捷方式导出为
graphify-out/converted/ 中的 Markdown 侧车文件,然后提取这些文件。
常用命令
/graphify .                        # build graph for current folder
/graphify ./docs --update          # re-extract only changed files
/graphify . --cluster-only         # rerun clustering without re-extracting
/graphify . --cluster-only --resolution 1.5      # more granular communities
/graphify . --cluster-only --exclude-hubs 99     # suppress utility super-hubs from god-node rankings
/graphify . --no-viz               # skip the HTML, just the report + JSON
/graphify . --wiki                 # build a markdown wiki from the graph
graphify export callflow-html      # Mermaid architecture/call-flow HTML (auto-regenerates on every git commit if hook is installed)

/graphify query "what connects auth to the database?"
/graphify path "UserService" "DatabasePool"
/graphify explain "RateLimiter"

/graphify add https://arxiv.org/abs/1706.03762   # fetch a paper and add it
/graphify add <youtube-url>                       # transcribe and add a video

graphify hook install              # auto-rebuild on git commit
graphify merge-graphs a.json b.json              # combine two graphs

graphify prs                       # PR dashboard: CI state, review status, worktree mapping
graphify prs 42                    # deep dive on PR #42 with graph impact
graphify prs --triage              # AI ranks your review queue (uses whatever backend is configured)
graphify prs --conflicts           # PRs sharing graph communities — merge-order risk
请参阅下方的完整命令参考。
忽略文件
在项目根目录创建 .graphifyignore — 语法与 .gitignore 相同,包括 ! 取反。
.gitignore 会自动生效。 graphify 会读取每个目录中的 .gitignore。如果还存在 .graphifyignore,两者会合并——.graphifyignore 中的模式最后求值,因此在冲突时优先生效(包括 ! 的否定规则)。添加 .graphifyignore 只会进一步排除文件;它绝不会重新纳入已被 .gitignore 排除的文件。子目录作用域与 git 相同——忽略文件只影响其自身子树。
# .graphifyignore
node_modules/
dist/
*.generated.py

# only index src/, ignore everything else
*
!src/
!src/**
团队配置
graphify-out/ 应提交到 git,以便团队中的每个人都能从同一份图谱起步。
建议添加到 .gitignore:
graphify-out/cost.json        # local only
# graphify-out/cache/         # optional: commit for speed, skip to keep repo small
manifest.json现已可移植——键以相对路径存储,并在加载时重新锚定,因此提交它是安全的,也能避免首次检出时进行完整重建。
工作流程:
- 由一人运行
/graphify .并提交graphify-out/。 - 所有人拉取代码——其助手可立即读取图谱。
- 运行
graphify hook install,在每次提交后自动重建(仅 AST,无 API 费用)。这还会配置 git merge driver,确保graph.json不会残留冲突标记——两名开发者并行提交时,其图谱会自动做并集合并。 - 当文档或论文变更时,运行
/graphify --update以刷新相应节点。
直接使用图谱
# query the graph from the terminal
graphify query "show the auth flow"
graphify query "what connects DigestAuth to Response?" --graph graphify-out/graph.json

# expose the graph as an MCP server (for repeated tool-call access)
python -m graphify.serve graphify-out/graph.json
python -m graphify.serve --graph graphify-out/graph.json  # --graph flag also accepted

# register with Kimi Code:
kimi mcp add --transport stdio graphify -- python -m graphify.serve graphify-out/graph.json

# or serve over HTTP so a whole team points at one URL (no local graphify needed):
python -m graphify.serve graphify-out/graph.json --transport http --port 8080
python -m graphify.serve graphify-out/graph.json --transport http --host 0.0.0.0 --api-key "$SECRET"
MCP 服务器为你的助手提供结构化访问:query_graph、get_node、get_neighbors、shortest_path、list_prs、get_pr_impact、triage_prs。
共享 HTTP 服务器
--transport stdio(默认)会为每位开发者启动一个本地服务器。--transport http 通过 MCP Streamable HTTP 传输提供相同工具,因此单个共享进程即可为整个团队提供图谱服务——客户端将 IDE 的 MCP 配置指向 http://<host>:8080/mcp,而无需在本地运行 graphify。
| Flag | Default | Purpose |
|---|---|---|
--transport {stdio,http} |
stdio |
要提供的传输方式 |
--host |
127.0.0.1 |
HTTP 绑定主机(使用 0.0.0.0 可暴露到 localhost 之外) |
--port |
8080 |
HTTP 绑定端口 |
--api-key |
env GRAPHIFY_API_KEY |
要求 Authorization: Bearer <key>(或 X-API-Key) |
--path |
/mcp |
HTTP 挂载路径 |
--json-response |
off | 返回纯 JSON,而非 SSE 流 |
--stateless |
off | 无每会话状态(适用于负载均衡 / CI 部署) |
--session-timeout |
3600 |
N 秒后回收空闲的有状态会话(0 可禁用) |
默认的 127.0.0.1 绑定仅限 loopback。在共享主机上对外暴露时,请同时设置 --host 0.0.0.0 和 --api-key。在容器中运行:
docker build -t graphify .
docker run -p 8080:8080 -v "$(pwd)/graphify-out:/data" graphify \
  /data/graph.json --transport http --host 0.0.0.0 --api-key "$SECRET"
WSL / Linux 说明: Ubuntu 自带
python3,而非python。请使用 venv 以避免冲突:python3 -m venv .venv && .venv/bin/pip install "graphifyy[mcp]"
环境变量
这些仅在无头 / CI 提取(graphify extract)时需要。通过 IDE 内的 /graphify skill 运行时,模型 API 由 IDE 会话提供——无需额外密钥。
| Variable | Used for | When required |
|---|---|---|
ANTHROPIC_API_KEY |
Claude(Anthropic)后端 | --backend claude |
ANTHROPIC_BASE_URL |
Anthropic 兼容端点 URL(LiteLLM 代理、网关等) | --backend claude(默认:https://api.anthropic.com) |
ANTHROPIC_MODEL |
Claude 后端的模型名称——对于自定义端点,请使用你的服务器暴露的模型名称/别名 | --backend claude(默认:claude-sonnet-4-6) |
GEMINI_API_KEY 或 GOOGLE_API_KEY |
Google Gemini 后端 | --backend gemini |
OPENAI_API_KEY |
OpenAI 或 OpenAI 兼容 API | --backend openai(本地服务器接受任意非空值) |
OPENAI_BASE_URL |
OpenAI 兼容服务器 URL(llama.cpp、vLLM、LM Studio 等) | --backend openai(默认:https://api.openai.com/v1) |
OPENAI_MODEL |
OpenAI 后端的模型名称——对于自托管服务器,请使用你的服务器暴露的模型名称/别名(查看其 /v1/models 端点),例如 llama.cpp 使用 LFM2.5-8B-A1B-UD-Q4_K_XL |
--backend openai(默认:gpt-4.1-mini) |
DEEPSEEK_API_KEY |
DeepSeek 后端 | --backend deepseek |
MOONSHOT_API_KEY |
Kimi Code 后端 | --backend kimi |
OLLAMA_BASE_URL |
Ollama 本地推理 URL | --backend ollama(默认:http://localhost:11434) |
OLLAMA_MODEL |
Ollama 模型名称 | --backend ollama(默认:自动检测) |
GRAPHIFY_OLLAMA_NUM_CTX |
覆盖 Ollama KV-cache 窗口大小 | 可选——默认自动调整 |
GRAPHIFY_OLLAMA_KEEP_ALIVE |
保持 Ollama 模型加载的分钟数 | 可选——设置 0 可在每个分块后卸载 |
AZURE_OPENAI_API_KEY |
Azure OpenAI Service 后端 | --backend azure |
AZURE_OPENAI_ENDPOINT |
Azure 资源端点 URL | --backend azure(需与 API 密钥一并提供) |
AZURE_OPENAI_API_VERSION |
Azure API 版本覆盖 | 可选——默认 2024-12-01-preview |
AZURE_OPENAI_DEPLOYMENT 或 GRAPHIFY_AZURE_MODEL |
Azure 部署名称 | 可选——默认 gpt-4o |
AWS_* / ~/.aws/credentials |
AWS Bedrock——标准凭证链 | --backend bedrock(无需 API 密钥,使用 IAM) |
GRAPHIFY_MAX_WORKERS |
AST 并行线程数 | 可选——也可通过 --max-workers 标志设置 |
GRAPHIFY_MAX_OUTPUT_TOKENS |
提高密集语料库的输出上限 | 可选——例如大文件使用 32768 |
GRAPHIFY_API_TIMEOUT |
HTTP、claude-cli 和 Anthropic SDK 后端的每次调用超时(秒)(默认:600) | 可选——也可通过 --api-timeout 标志设置 |
GRAPHIFY_MAX_RETRIES |
放弃前对限速(429)请求的重试次数(默认:6;遵守 Retry-After) |
可选——对于严格的组织级限制(例如 kimi)可提高;0 可禁用 |
GRAPHIFY_FORCE |
即使节点更少也强制重建图谱 | 可选——也可通过 --force 标志设置 |
GRAPHIFY_GOOGLE_WORKSPACE |
自动启用 Google Workspace 导出 | 可选——设置为 1 |
GRAPHIFY_TRIAGE_BACKEND |
graphify prs --triage 的后端 |
可选——根据可用密钥自动检测 |
GRAPHIFY_TRIAGE_MODEL |
分类(triage)的模型覆盖 | 可选——例如 claude-opus-4-7 |
GRAPHIFY_QUERY_LOG_ENABLE |
设置为 1 可在 ~/.cache/graphify-queries.log 启用本地查询日志(记录每次 query/path/explain 问题及语料库路径)。默认关闭——除非你主动启用,否则不会写入任何内容(#1797) |
可选 |
GRAPHIFY_QUERY_LOG |
启用查询日志并写入此路径,而非默认路径 | 可选——除非设置此项或 _ENABLE,否则关闭 |
GRAPHIFY_QUERY_LOG_DISABLE |
设置为 1 可强制关闭查询日志(优先于启用变量) |
可选 |
GRAPHIFY_QUERY_LOG_RESPONSES |
启用日志时,同时记录完整子图响应(默认关闭) | 可选 |
GRAPHIFY_MAX_GRAPH_BYTES |
覆盖 512 MiB 的 graph.json 大小上限——例如 700MB、2GB 或纯字节数 |
可选——适用于非常大的语料库 |
GRAPHIFY_LLM_TEMPERATURE |
覆盖语义提取的 LLM 温度——例如 0.7,或 none 以省略 |
可选——对 o1/o3/o4/gpt-5 推理模型会自动省略 |
隐私
- 代码文件 — 通过 tree-sitter 在本地处理。数据不会离开你的机器。仅含代码的语料库无需 API 密钥 —
graphify extract可完全离线运行。 - 视频 / 音频 — 使用 faster-whisper 在本地转写。数据不会离开你的机器。
- 文档、PDF、图片 — 发送给你的 AI 助手进行语义提取(通过
/graphify技能,使用你 IDE 会话中运行的任意模型)。无头(headless)graphify extract需要GEMINI_API_KEY/GOOGLE_API_KEY(Gemini)、MOONSHOT_API_KEY(Kimi)、ANTHROPIC_API_KEY(Claude)、OPENAI_API_KEY(OpenAI)、DEEPSEEK_API_KEY(DeepSeek)、正在运行的 Ollama 实例(OLLAMA_BASE_URL)、通过标准提供程序链的 AWS 凭证(Bedrock — 无需 API 密钥,使用 IAM),或claudeCLI 二进制文件(Claude Code — 无需 API 密钥,使用你的 Claude 订阅)。--dedup-llm标志使用相同的密钥。 - 数据驻留 —
graphify extract会根据已设置的 API 密钥自动检测使用哪个提供程序(优先级:Gemini → Kimi → Claude → OpenAI → DeepSeek → Azure → Bedrock → Ollama)。对于有数据驻留要求的代码,请使用--backend ollama(完全本地),或传入显式的--backend标志。Kimi(MOONSHOT_API_KEY)会路由到中国境内的 Moonshot AI 服务器。 - 无遥测、无使用跟踪、无分析。
- 查询日志 — 每次
graphify query、graphify path、graphify explain和 MCPquery_graph调用都会以 JSON Lines 格式记录到~/.cache/graphify-queries.log(时间戳、问题、语料库、返回的节点、耗时)。默认情况下不会存储完整的子图响应。设置GRAPHIFY_QUERY_LOG_DISABLE=1可退出,或设置GRAPHIFY_QUERY_LOG=/dev/null可在不关闭代码路径的情况下静默日志。
故障排除
安装后出现 graphify: command not found
CLI 已安装,但其 bin 目录不在 shell 的 PATH 中。根据你的安装方式选择修复方法:
- uv(
uv tool install graphifyy):命令会安装到 uv 的工具 bin 目录(~/.local/bin),全新的 macOS/zsh 环境通常不会将其加入PATH。运行uv tool update-shell,然后打开新终端。(使用uv tool dir --bin查找该目录。) - pipx(
pipx install graphifyy):运行pipx ensurepath,然后打开新终端。 - pip(
pip install graphifyy):pip 将脚本安装到用户 bin 目录,该目录可能不在PATH中 — 将~/Library/Python/3.x/bin(macOS)或~/.local/bin(Linux)添加到你的PATH中的~/.zshrc/~/.bashrc,或直接运行python -m graphify。
uvx graphify … 或 uv tool run graphify … 无法解析 graphify
PyPI 包名为 graphifyy;graphify 只是它提供的命令。uv tool run 将第一个词视为包名,因此会查找名为 graphify 的包并报告 No solution found … no versions of graphify。请显式指定包名:uvx --from graphifyy graphify install(与 uv tool run --from graphifyy graphify install 相同)。或先运行一次 uv tool install graphifyy,然后直接调用 graphify。
python -m graphify 可用但 graphify 命令不可用
你的 shell 的 PATH 不包含命令所安装到的 bin 目录。优先使用 uv tool install / pipx install,而非普通的 pip,然后运行 uv tool update-shell / pipx ensurepath 并打开新终端(参见上文安装说明)。
/graphify . 在 PowerShell 中导致“路径无法识别”
PowerShell 将开头的 / 视为路径分隔符。在 Windows 上请使用 graphify .(无斜杠)。
--update 或重建后图的节点变少
如果重构删除了文件,旧节点会残留。传入 --force(或设置 GRAPHIFY_FORCE=1)以在重建后节点更少时仍覆盖写入。
图中同一实体出现重复节点(幽灵重复) 幽灵重复(同一符号出现两次 — 一次来自带源码位置的 AST 提取,一次来自无语义位置的语义提取)现已在构建时自动合并。如果你在 v0.8.33 之前构建的图中看到此问题,请运行完整重新提取以清理:
graphify extract . --force
Ollama 显存不足 / 超出上下文窗口 KV-cache 窗口会自动调整大小,但可能对你的 GPU 来说过大。缩小它:
GRAPHIFY_OLLAMA_NUM_CTX=8192 graphify extract ./docs --backend ollama --token-budget 4000
LLM returned invalid JSON / Unterminated string 警告
模型的 JSON 响应达到了输出 token 上限,在字符串中间被截断。graphify 会自动恢复(它会拆分块并重新提取两半,过大的单个文档会先在标题/段落边界处切片,以确保仍覆盖整个文件),因此这些警告很嘈杂但不会造成数据丢失。要减少反复处理,可提高输出上限或缩小每个块的输出:
GRAPHIFY_MAX_OUTPUT_TOKENS=16384 graphify extract . --mode deep   # lift the cap
graphify extract . --mode deep --token-budget 4000                # smaller input chunks -> smaller output
对于 OpenRouter 等云端网关,优先使用 --backend openai(设置 OPENAI_BASE_URL),而非 Ollama shim — 这是更简洁的 OpenAI 兼容路径。如果模型本身有最大输出上限,降低 --token-budget 是更可靠的手段。
图 HTML 过大无法在浏览器中打开(>5000 个节点) 跳过 HTML 生成,直接使用 JSON:
graphify cluster-only ./my-project --no-viz
graphify query "..."
两名开发者同时提交后 graph.json 出现冲突标记
运行 graphify hook install — 它会设置 git 合并驱动程序,自动对 graph.json 进行并集合并,从而避免冲突。
文档或 PDF 的提取返回空节点/边 文档、PDF 和图片需要 LLM 调用 — 仅含代码的语料库无需密钥。请检查 API 密钥是否已设置且后端是否正确:
ANTHROPIC_API_KEY=sk-... graphify extract ./docs --backend claude
IDE 中出现技能版本不匹配警告 你安装的 graphify 版本与技能文件不同。请更新:
uv tool upgrade graphifyy
graphify install  # overwrites the skill file
每次 graphify extract 后 Claude Code 提示缓存失效
Graphify 会将输出文件(graph.json、graphify-out/)写入工作区。如果这些路径未被忽略,每次写入都会使 Claude Code 的提示缓存失效,迫使下一轮以缓存写入费率进行完整重新上传。将它们添加到 .claudeignore:
# .claudeignore
graph.json
graphify-out/
完整命令参考
/graphify                          # run on current directory
/graphify ./raw                    # run on a specific folder
/graphify ./raw --mode deep        # more aggressive relationship extraction
/graphify ./raw --update           # re-extract only changed files
/graphify ./raw --directed         # preserve edge direction
/graphify ./raw --cluster-only     # rerun clustering on existing graph
/graphify ./raw --no-viz           # skip HTML visualization
/graphify ./raw --obsidian         # generate Obsidian vault
/graphify ./raw --obsidian --obsidian-dir ~/vault  # write into an existing vault (never overwrites your own notes or .obsidian config)
/graphify ./raw --wiki             # build agent-crawlable markdown wiki
/graphify ./raw --svg              # export graph.svg
/graphify ./raw --graphml          # export for Gephi / yEd
/graphify ./raw --neo4j            # generate cypher.txt for Neo4j
/graphify ./raw --neo4j-push bolt://localhost:7687
/graphify ./raw --falkordb         # generate cypher.txt for FalkorDB
/graphify ./raw --falkordb-push falkordb://localhost:6379
/graphify ./raw --watch            # auto-sync as files change
/graphify ./raw --mcp              # start MCP stdio server

/graphify add https://arxiv.org/abs/1706.03762
/graphify add <video-url>
/graphify add https://... --author "Name" --contributor "Name"

/graphify query "what connects attention to the optimizer?"
/graphify query "..." --dfs --budget 1500
/graphify path "DigestAuth" "Response"
/graphify explain "SwinTransformer"

graphify save-result --question "Q" --answer "A" --nodes Foo Bar --outcome useful   # record how a Q&A turned out (work memory; outcome ∈ useful|dead_end|corrected)
graphify reflect                   # aggregate graphify-out/memory/ outcomes into reflections/LESSONS.md
graphify reflect --if-stale        # no-op when LESSONS.md is already newer than every input (cheap to run each session)
graphify reflect --out docs/LESSONS.md    # write the lessons doc somewhere else
graphify reflect --graph graphify-out/graph.json  # group lessons by community + write the work-memory overlay (.graphify_learning.json)
                                   # the overlay tags nodes preferred/tentative/contested (recency-weighted, with provenance);
                                   # graphify explain / query then show a "Lesson:" hint, flagged "code changed — re-verify" when the source moved on

graphify uninstall                 # remove from all platforms in one shot
graphify uninstall --purge         # also delete graphify-out/
graphify uninstall --project --platform codex  # remove project-scoped install files only

graphify hook install              # post-commit + post-checkout hooks
graphify hook uninstall
graphify hook status

# always-on assistant instructions - platform-specific
graphify claude install            # CLAUDE.md + PreToolUse hook (Claude Code)
graphify claude uninstall
graphify codebuddy install         # CODEBUDDY.md + PreToolUse hook (CodeBuddy)
graphify codebuddy uninstall
graphify codex install             # AGENTS.md + PreToolUse hook in .codex/hooks.json (Codex)
graphify opencode install          # AGENTS.md + tool.execute.before plugin (OpenCode)
graphify kilo install              # native Kilo skill + /graphify command + AGENTS.md + .kilo plugin
graphify kilo uninstall
graphify cursor install            # .cursor/rules/graphify.mdc (Cursor)
graphify cursor uninstall
graphify gemini install            # GEMINI.md + BeforeTool hook (Gemini CLI)
graphify gemini uninstall
graphify copilot install           # skill file (GitHub Copilot CLI)
graphify copilot uninstall
graphify aider install             # AGENTS.md (Aider)
graphify aider uninstall
graphify claw install              # AGENTS.md (OpenClaw)
graphify claw uninstall
graphify droid install             # AGENTS.md (Factory Droid)
graphify droid uninstall
graphify trae install              # AGENTS.md (Trae)
graphify trae uninstall
graphify trae-cn install           # AGENTS.md (Trae CN)
graphify trae-cn uninstall
graphify hermes install             # AGENTS.md + ~/.hermes/skills/ (Hermes)
graphify hermes uninstall
graphify amp install               # skill file (Amp)
graphify amp uninstall
graphify agents install            # ~/.agents/skills/ + AGENTS.md (cross-framework; alias: graphify skills)
graphify agents uninstall
graphify kiro install               # .kiro/skills/ + .kiro/steering/graphify.md (Kiro IDE/CLI)
graphify kiro uninstall
graphify pi install                # skill file (Pi coding agent)
graphify pi uninstall
graphify devin install             # skill file + .windsurf/rules/graphify.md (Devin CLI)
graphify devin uninstall
graphify antigravity install       # .agents/rules + .agents/workflows (Google Antigravity)
graphify antigravity uninstall

graphify extract ./docs                        # headless LLM extraction for CI (no IDE needed)
graphify extract ./docs --backend gemini       # explicit backend: gemini, kimi, claude, openai, deepseek, ollama, bedrock, or claude-cli
graphify extract ./docs --backend gemini --model gemini-3.1-pro-preview
graphify extract ./docs --backend ollama       # local Ollama (set OLLAMA_BASE_URL / OLLAMA_MODEL) - no API key needed for loopback
OPENAI_BASE_URL=http://localhost:8080/v1 OPENAI_MODEL=my-model graphify extract ./docs --backend openai   # any OpenAI-compatible server (llama.cpp, vLLM, LM Studio)
ANTHROPIC_BASE_URL=http://localhost:4000 ANTHROPIC_MODEL=my-model graphify extract ./docs --backend claude   # any Anthropic-compatible endpoint (LiteLLM proxy, gateways)
GRAPHIFY_OLLAMA_NUM_CTX=32768 graphify extract ./docs --backend ollama   # override KV-cache window (auto-sized by default)
GRAPHIFY_OLLAMA_KEEP_ALIVE=0 graphify extract ./docs --backend ollama    # unload model after each chunk (saves VRAM on small GPUs)
graphify extract ./docs --backend bedrock      # AWS Bedrock via IAM - no API key, uses AWS credential chain
graphify extract ./docs --backend claude-cli   # route through Claude Code CLI - no API key, uses your Claude subscription
graphify extract ./docs --backend azure        # Azure OpenAI (set AZURE_OPENAI_API_KEY + AZURE_OPENAI_ENDPOINT)
graphify extract ./docs --max-workers 16       # AST parallelism (also GRAPHIFY_MAX_WORKERS)
graphify extract --postgres "postgresql://user:pass@host/db"   # introspect live PostgreSQL schema directly
graphify extract ./my-workspace --cargo        # introspect Rust Cargo workspace dependencies directly
graphify extract ./docs --token-budget 30000   # smaller semantic chunks for local/small models
graphify extract ./docs --max-concurrency 2    # fewer parallel LLM calls (useful for local inference)
graphify extract ./docs --api-timeout 900      # longer HTTP timeout for slow local models (default 600s)
graphify extract ./docs --google-workspace     # export .gdoc/.gsheet/.gslides via gws before extraction
graphify extract ./docs --mode deep            # richer semantic extraction via extended system prompt
graphify extract ./docs --no-cluster           # raw extraction only, skip clustering
graphify extract ./docs --timing               # print per-stage wall-clock timings to stderr (also works on cluster-only)
graphify extract ./docs --force                # overwrite graph.json even if new graph has fewer nodes (use after refactors or to clear ghost duplicates)
graphify extract ./docs --dedup-llm            # LLM tiebreaker for ambiguous entity pairs (uses same API key)
graphify extract ./docs --global --as myrepo   # extract and register into the cross-project global graph
GRAPHIFY_MAX_OUTPUT_TOKENS=32768 graphify extract ./docs --backend claude  # raise output cap for dense corpora

graphify export callflow-html                       # graphify-out/<project>-callflow.html
graphify export callflow-html --max-sections 8      # cap generated architecture sections
graphify export callflow-html --output docs/arch.html
graphify export callflow-html ./some-repo/graphify-out

graphify global add graphify-out/graph.json --as myrepo   # register a project graph into ~/.graphify/global-graph.json
graphify global remove myrepo                         # remove a project from the global graph
graphify global list                                  # show all registered repos + node/edge counts
graphify global path                                  # print path to the global graph file

graphify prs                              # PR dashboard: CI, review, worktree, graph impact
graphify prs 42                           # deep dive on PR #42
graphify prs --triage                     # AI triage ranking (auto-detects backend from env)
graphify prs --worktrees                  # worktree → branch → PR mapping
graphify prs --conflicts                  # PRs sharing graph communities (merge-order risk)
graphify prs --base main                  # filter to PRs targeting a specific base branch
graphify prs --repo owner/repo            # run against a different GitHub repo
GRAPHIFY_TRIAGE_BACKEND=kimi graphify prs --triage   # use a specific backend for triage

graphify clone https://github.com/karpathy/nanoGPT
graphify merge-graphs a.json b.json --out merged.json
graphify --version                                    # print installed version
graphify watch ./src
graphify check-update ./src
graphify update ./src
graphify update ./src --no-cluster  # skip reclustering, write raw AST graph only
graphify update ./src --force       # overwrite even if new graph has fewer nodes
graphify cluster-only ./my-project
graphify cluster-only ./my-project --graph path/to/graph.json  # custom graph location
graphify cluster-only ./my-project --max-concurrency 16 --batch-size 200  # parallel community labeling (large graphs)
graphify cluster-only ./my-project --resolution 1.5            # more, smaller communities
graphify cluster-only ./my-project --exclude-hubs 99           # exclude p99 degree nodes from partitioning
graphify cluster-only ./my-project --no-label                  # keep "Community N" placeholders
graphify cluster-only ./my-project --backend=gemini            # backend for community naming
graphify cluster-only ./my-project --backend=gemini --model gemini-2.5-pro  # specific model
graphify label ./my-project                                    # (re)name communities with the configured backend
graphify label ./my-project --backend=openai --model gpt-4o   # force a specific backend and model
社区名称: 在 agent 内部(Claude Code、Gemini CLI)时,agent 会自行命名社区。当你运行裸 CLI 时,
cluster-only会使用已配置的后端(内置或自定义 OpenAI 兼容提供商)自动命名——传入--no-label以保留Community N,或运行graphify label按需(重新)生成名称。
了解更多
- How it works — 抽取流水线、社区检测、置信度评分、基准测试
- ARCHITECTURE.md — 模块划分、如何添加一门语言
- Optional integrations — Docker MCP Toolkit + SQLite
- The Memory Layer — 介绍 graphify 背后理念与端到端架构的著作
基于 graphify 构建:Penpax
Penpax 是基于 graphify 之上构建的常驻层——它将同样的图方法应用于你的整个工作生活:会议、浏览器历史、电子邮件、文件和代码,并在后台持续更新。
专为那些工作分散在数百次对话和文档中、永远无法完整回溯的人而打造。无云端,完全在设备本地运行。
免费试用即将推出。 加入候补名单 →
参与贡献
开发环境配置
项目使用 uv 进行开发工作流。安装一次后:
git clone https://github.com/safishamsi/graphify.git
cd graphify
git checkout v8                        # active development branch

# Create the project venv and install graphify + all extras + the dev group
# (pytest). uv installs the dev dependency group by default; pass --no-dev to
# skip it.
uv sync --all-extras
验证可编辑安装:
uv run graphify --version
uv run python -c "import graphify; print(graphify.__file__)"
运行测试
uv run pytest tests/ -q                # run the full suite
uv run pytest tests/test_extract.py -q # one module
uv run pytest tests/ -q -k "python"    # filter by name
macOS 说明:测试套件同时包含
sample.f90和sample.F90测试夹具。这些在大小写不敏感的 HFS+ / APFS 文件系统上会冲突。如需同时测试两种 Fortran 变体,请在 Linux 或 Docker 容器中运行。
Git 工作流
- 活跃开发在
v8分支上进行。 - 提交风格:
fix: <description>/feat: <description>/docs: <description> - 提交 PR 前,运行
uv run pytest tests/ -q并确认通过。 - 为任何新的语言抽取器,在
tests/fixtures/中添加夹具文件,并在tests/test_languages.py中添加测试。
可以贡献什么
实战示例 是最有价值的贡献。在真实语料上运行 /graphify,将输出保存到 worked/{slug}/,撰写一份客观的 review.md,说明图分析哪些做对了、哪些做错了,然后提交 PR。
抽取缺陷 — 提交 issue 时请附上输入文件、缓存条目(graphify-out/cache/),以及遗漏或错误之处。
模块职责与如何添加语言,请参阅 ARCHITECTURE.md。
社区与链接


