> [!NOTE]
> 本文档由 WeHub 基于上游 README 翻译整理,属于社区翻译,非官方中文文档。
> [English](./README.en.md) · [原始项目](https://github.com/simular-ai/Agent-S) · [上游 README](https://github.com/simular-ai/Agent-S/blob/HEAD/README.md)
> 原作者、版权与许可证归属以原始项目及本仓库 LICENSE 文件为准。
 Agent S:
像人类一样使用计算机
Agent S:
像人类一样使用计算机
🏆 Agent S3:首个在 OSWorld 上超越人类表现(72.60%)
🌐 [S3 博客]
📄 [S3 论文]
🎥 [S3 视频]
🌐 [S2 博客]
📄 [S2 论文(COLM 2025)]
🎥 [S2 视频]
🌐 [S1 博客]
📄 [S1 论文(ICLR 2025)]
🎥 [S1 视频]




## 🥳 更新
- [x] **2025/12/15**:Agent S3 **首次**在 OSWorld 上以 **72.60%** 的出色成绩超越人类水平表现!
- [x] **2025/10/02**:发布 Agent S3 及其[技术论文](https://arxiv.org/abs/2510.02250), setting a new SOTA of **69.9%** on OSWorld (approaching 72% human performance), with strong generalizability on WindowsAgentArena and AndroidWorld! It is also simpler, faster, and more flexible.
- [x] **2025/08/01**:发布 Agent S2.5(gui-agents v0.2.5):更简单、更好、更快! 上创下新的 SOTA
- [x] **2025/07/07**:[Agent S2 论文](https://arxiv.org/abs/2504.00906) 被 COLM 2025 接收!蒙特利尔见!
- [x] **2025/04/27**:Agent S 论文在 ICLR 2025 Agentic AI for Science Workshop 荣获最佳论文奖 🏆!
- [x] **2025/04/01**:发布 [Agent S2 论文](https://arxiv.org/abs/2504.00906),在 OSWorld、WindowsAgentArena 和 AndroidWorld 上取得新的 SOTA 结果!
- [x] **2025/03/12**:发布 Agent S2 以及 [gui-agents](https://github.com/simular-ai/Agent-S), v0.2.0,成为计算机使用智能体(CUA)的新标杆,性能超越 OpenAI 的 CUA/Operator 和 Anthropic 的 Claude 3.7 Sonnet Computer-Use!
- [x] **2025/01/22**:[Agent S 论文](https://arxiv.org/abs/2410.08164) 被 ICLR 2025 接收!
- [x] **2025/01/21**:发布 [gui-agents](https://github.com/simular-ai/Agent-S) v0.1.2 库,支持 Linux 和 Windows!
- [x] **2024/12/05**:发布 [gui-agents](https://github.com/simular-ai/Agent-S) v0.1.0 库,让你轻松在 Mac、OSWorld 和 WindowsAgentArena 上使用 Agent-S!
- [x] **2024/10/10**:发布 [Agent S 论文](https://arxiv.org/abs/2410.08164) 及代码库!
## 目录
1. [💡 简介](#-introduction)
2. [🎯 当前成果](#-current-results)
3. [🛠️ 安装与配置](#%EF%B8%8F-installation--setup)
4. [🚀 用法](#-usage)
5. [🤝 致谢](#-acknowledgements)
6. [💬 引用](#-citation)
## 💡 简介
欢迎使用 **Agent S**,这是一个开源框架,旨在通过智能体-计算机接口(Agent-Computer Interface)实现与计算机的自主交互。我们的使命是构建智能 GUI 智能体,使其能够从过往经验中学习,并在你的计算机上自主完成复杂任务。
无论你是对 AI、自动化感兴趣,还是希望为前沿的智能体系统做贡献,我们都很高兴你能来到这里!
## 🎯 当前成果

在 OSWorld 上,仅 Agent S3 在 100 步设置下即可达到 66%,已超过此前 63.4% 的最先进水平(GTA1 w/ GPT-5)。加入 Behavior Best-of-N 后,性能进一步提升至 72.6%,*超越* OSWorld 上的人类水平表现(约 72%)!
Agent S3 还展现出强大的零样本泛化能力!在 WindowsAgentArena 上,仅使用 Agent S3 时准确率为 50.2%,通过从 3 次 rollout 中择优选择可提升至 56.6%。在 AndroidWorld 上,性能也从 68.1% 提升至 71.6%
## 🛠️ 安装与配置
### 前置要求
- **单显示器**:我们的智能体面向单显示器屏幕设计
- **安全性**:该智能体会运行 Python 代码来控制你的计算机——请谨慎使用
- **支持的平台**:Linux、Mac 和 Windows
### 安装
若无需克隆仓库即可安装 Agent S3,请运行
```bash
pip install gui-agents
```
如果你想在修改代码的同时测试 Agent S3,请克隆仓库并按以下方式安装
```
pip install -e .
```
别忘了还要 `brew install tesseract`!Pytesseract 需要此额外安装才能正常工作。
### API 配置
#### 选项 1:环境变量
添加到你的 `.bashrc`(Linux)或 `.zshrc`(MacOS):
```bash
export OPENAI_API_KEY=
export ANTHROPIC_API_KEY=
export HF_TOKEN=
```
#### 选项 2:Python 脚本
```python
import os
os.environ["OPENAI_API_KEY"] = ""
```
### 支持的模型
我们支持 Azure OpenAI、Anthropic、Gemini、Open Router 和 vLLM 推理。详见 [models.md](models.md)。
### 定位模型(必需)
为获得最佳性能,我们推荐使用托管在 Hugging Face Inference Endpoints 或其他提供商上的 [UI-TARS-1.5-7B](https://huggingface.co/ByteDance-Seed/UI-TARS-1.5-7B)。设置说明请参阅 [Hugging Face Inference Endpoints](https://huggingface.co/learn/cookbook/en/enterprise_dedicated_endpoints)。
## 🚀 用法
> ⚡️ **推荐配置:**
> 为获得最佳配置,我们建议使用 **OpenAI gpt-5-2025-08-07** 作为主模型,并搭配 **UI-TARS-1.5-7B** 进行 grounding。
### CLI
请注意,这里运行的是我们改进后的 Agent S3,未使用 bBoN。
使用必需参数运行 Agent S3:
```bash
agent_s \
--provider openai \
--model gpt-5-2025-08-07 \
--ground_provider huggingface \
--ground_url http://localhost:8080 \
--ground_model ui-tars-1.5-7b \
--grounding_width 1920 \
--grounding_height 1080
```
#### 本地编码环境(可选)
对于需要执行代码的任务(例如数据处理、文件操作、系统自动化),你可以启用本地编码环境:
```bash
agent_s \
--provider openai \
--model gpt-5-2025-08-07 \
--ground_provider huggingface \
--ground_url http://localhost:8080 \
--ground_model ui-tars-1.5-7b \
--grounding_width 1920 \
--grounding_height 1080 \
--enable_local_env
```
⚠️ **警告**:本地编码环境会在你的计算机上本地执行任意 Python 和 Bash 代码。请仅在受信任的环境中、并使用受信任的输入时使用此功能。
#### 必需参数
- **`--provider`**:主生成模型提供商(例如 openai、anthropic 等)- 默认值:"openai"
- **`--model`**:主生成模型名称(例如 gpt-5-2025-08-07)- 默认值:"gpt-5-2025-08-07"
- **`--ground_provider`**:接地(grounding)模型的提供商 - **必需**
- **`--ground_url`**:接地模型的 URL - **必需**
- **`--ground_model`**:接地模型的模型名称 - **必需**
- **`--grounding_width`**:接地模型输出坐标分辨率的宽度 - **必需**
- **`--grounding_height`**:接地模型输出坐标分辨率的高度 - **必需**
#### 可选参数
- **`--model_temperature`**:将所有模型调用固定为此温度(对于 o3 等模型需要设置为 1.0,但对于其他模型可以留空)
#### 接地模型尺寸
接地宽度和高度应与你的接地模型的输出坐标分辨率相匹配:
- **UI-TARS-1.5-7B**:使用 `--grounding_width 1920 --grounding_height 1080`
- **UI-TARS-72B**:使用 `--grounding_width 1000 --grounding_height 1000`
#### 可选参数
- **`--model_url`**:主生成模型的自定义 API URL - 默认值:""
- **`--model_api_key`**:主生成模型的 API 密钥 - 默认值:""
- **`--ground_api_key`**:接地模型端点的 API 密钥 - 默认值:""
- **`--max_trajectory_length`**:轨迹中保留的最大图像轮次数量 - 默认值:8
- **`--enable_reflection`**:启用反思智能体(reflection agent)以辅助工作智能体 - 默认值:True
- **`--enable_local_env`**:启用用于代码执行的本地编码环境(警告:会在本地执行任意代码)- 默认值:False
#### 本地编码环境详情
本地编码环境使 Agent S3 能够直接在你的计算机上执行 Python 和 Bash 代码。这对于以下场景特别有用:
- **数据处理**:操作电子表格、CSV 文件或数据库
- **文件操作**:批量文件处理、内容提取或文件整理
- **系统自动化**:配置更改、系统设置或自动化脚本
- **代码开发**:编写、编辑或执行代码文件
- **文本处理**:文档操作、内容编辑或格式化
启用后,智能体可以使用 `call_code_agent` 操作来执行代码块,以完成可通过编程而非 GUI 交互完成的任务。
**要求:**
- **Python**:用于运行 Agent S3 的同一 Python 解释器(自动检测)
- **Bash**:位于 `/bin/bash`(在 macOS 和 Linux 上为标准配置)
- **系统权限**:智能体以执行它的用户相同的权限运行
**安全注意事项:**
- 本地环境以运行智能体的用户相同的权限执行任意代码
- 仅在受信任的环境中启用此功能
- 当智能体生成用于系统级操作的代码时要谨慎
- 对于不受信任的任务,考虑在沙盒环境中运行
- Bash 脚本以 30 秒超时执行,以防止进程挂起
### `gui_agents` SDK
首先,我们导入必要的模块。`AgentS3` 是 Agent S3 的主智能体类。`OSWorldACI` 是我们的接地智能体,它将智能体动作翻译为可执行的 Python 代码。
```python
import pyautogui
import io
from gui_agents.s3.agents.agent_s import AgentS3
from gui_agents.s3.agents.grounding import OSWorldACI
from gui_agents.s3.utils.local_env import LocalEnv # Optional: for local coding environment
# Load in your API keys.
from dotenv import load_dotenv
load_dotenv()
current_platform = "linux" # "darwin", "windows"
```
接下来,我们定义引擎参数。`engine_params` 用于主智能体,`engine_params_for_grounding` 用于接地。对于 `engine_params_for_grounding`,我们支持 HuggingFace TGI、vLLM 和 Open Router 等自定义端点。
```python
engine_params = {
"engine_type": provider,
"model": model,
"base_url": model_url, # Optional
"api_key": model_api_key, # Optional
"temperature": model_temperature # Optional
}
# Load the grounding engine from a custom endpoint
ground_provider = ""
ground_url = ""
ground_model = ""
ground_api_key = ""
# Set grounding dimensions based on your model's output coordinate resolution
# UI-TARS-1.5-7B: grounding_width=1920, grounding_height=1080
# UI-TARS-72B: grounding_width=1000, grounding_height=1000
grounding_width = 1920 # Width of output coordinate resolution
grounding_height = 1080 # Height of output coordinate resolution
engine_params_for_grounding = {
"engine_type": ground_provider,
"model": ground_model,
"base_url": ground_url,
"api_key": ground_api_key, # Optional
"grounding_width": grounding_width,
"grounding_height": grounding_height,
}
```
然后,我们定义接地智能体和 Agent S3。
```python
# Optional: Enable local coding environment
enable_local_env = False # Set to True to enable local code execution
local_env = LocalEnv() if enable_local_env else None
grounding_agent = OSWorldACI(
env=local_env, # Pass local_env for code execution capability
platform=current_platform,
engine_params_for_generation=engine_params,
engine_params_for_grounding=engine_params_for_grounding,
width=1920, # Optional: screen width
height=1080 # Optional: screen height
)
agent = AgentS3(
engine_params,
grounding_agent,
platform=current_platform,
max_trajectory_length=8, # Optional: maximum image turns to keep
enable_reflection=True # Optional: enable reflection agent
)
```
最后,让我们查询智能体!
```python
# Get screenshot.
screenshot = pyautogui.screenshot()
buffered = io.BytesIO()
screenshot.save(buffered, format="PNG")
screenshot_bytes = buffered.getvalue()
obs = {
"screenshot": screenshot_bytes,
}
instruction = "Close VS Code"
info, action = agent.predict(instruction=instruction, observation=obs)
exec(action[0])
```
有关推理循环工作原理的更多详情,请参阅 `gui_agents/s3/cli_app.py`。
### OSWorld
要在 OSWorld 中部署 Agent S3,请遵循 [OSWorld 部署说明](osworld_setup/s3/OSWorld.md)。
## 💬 引用
如果你认为此代码库有用,请引用:
```
@misc{Agent-S3,
title={The Unreasonable Effectiveness of Scaling Agents for Computer Use},
author={Gonzalo Gonzalez-Pumariega and Vincent Tu and Chih-Lun Lee and Jiachen Yang and Ang Li and Xin Eric Wang},
year={2025},
eprint={2510.02250},
archivePrefix={arXiv},
primaryClass={cs.AI},
url={https://arxiv.org/abs/2510.02250},
}
@misc{Agent-S2,
title={Agent S2: A Compositional Generalist-Specialist Framework for Computer Use Agents},
author={Saaket Agashe and Kyle Wong and Vincent Tu and Jiachen Yang and Ang Li and Xin Eric Wang},
year={2025},
eprint={2504.00906},
archivePrefix={arXiv},
primaryClass={cs.AI},
url={https://arxiv.org/abs/2504.00906},
}
@inproceedings{Agent-S,
title={{Agent S: An Open Agentic Framework that Uses Computers Like a Human}},
author={Saaket Agashe and Jiuzhou Han and Shuyu Gan and Jiachen Yang and Ang Li and Xin Eric Wang},
booktitle={International Conference on Learning Representations (ICLR)},
year={2025},
url={https://arxiv.org/abs/2410.08164}
}
```
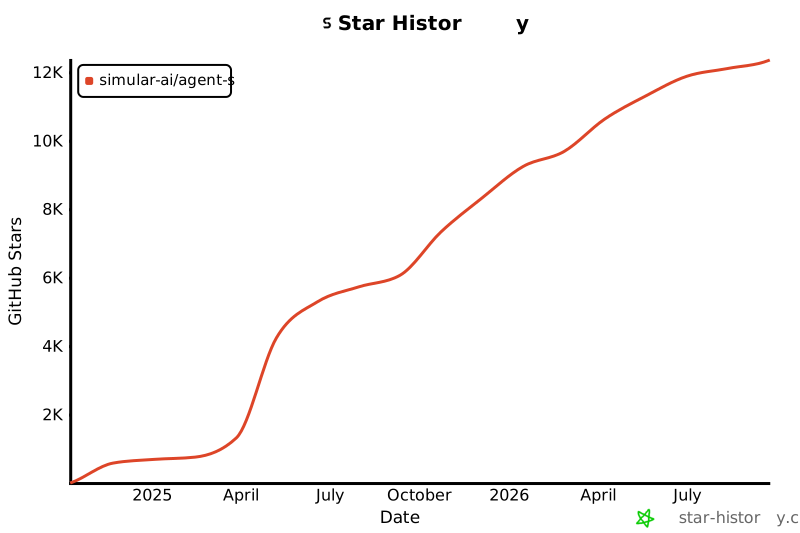
## Star 历史
[](https://star-history.com/#simular-ai/Agent-S&Date)