 wehub-resource-sync
DreamBooth fine-tuning of Stable Diffusion with Ray Train
| Template Specification | Description |
|---|---|
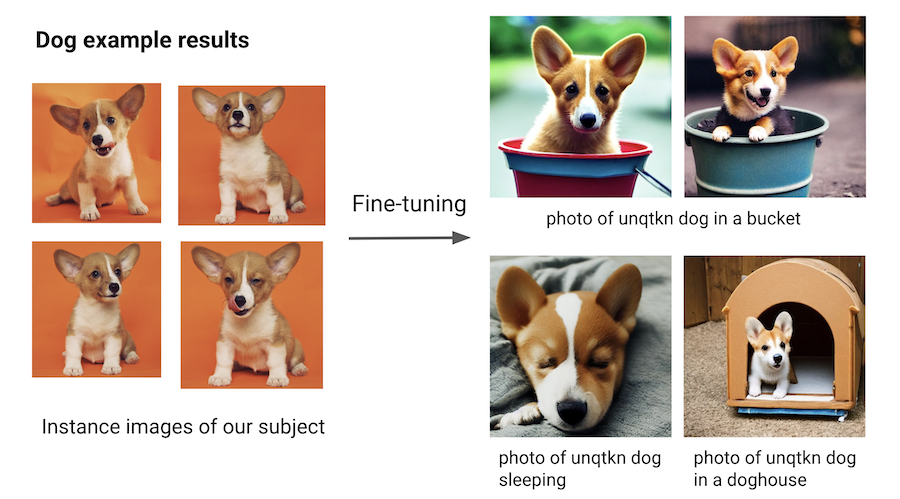
| Summary | This example shows how to do DreamBooth fine-tuning of a Stable Diffusion model using Ray Train for data-parallel training with many workers and Ray Data for data ingestion. Use one of the provided datasets, or supply your own photos. By the end of this example, you'll be able to generate images of your subject in a variety of situations, just by feeding in a text prompt! |
| Time to Run | ~10-15 minutes to generate a regularization dataset and fine-tune the model on photos of your subject. |
| Minimum Compute Requirements | At least 1 GPUs, where each GPU has >= 24GB GRAM. The default is 1 node with 4 GPUS: A10G GPU (AWS) or L4 GPU (GCE). |
| Cluster Environment | This template uses a Docker image built on top of the latest Anyscale-provided Ray image using Python 3.9: anyscale/ray:latest-py39-cu118. See the appendix below for more details. |
Run the example
This README will only contain minimal instructions on running this example on Anyscale. See the guide on the Ray documentation for a step-by-step walkthrough of the training code.
You can get started fine-tuning on a sample dog dataset with default settings with the following commands:
chmod +x ./dreambooth_run.sh
./dreambooth_run.sh
Customizing the example
Here are a few modifications to the dreambooth_run.sh script that you may want to make:
- The image dataset of your subject. This example provides two sample datasets, but you can also supply your own directory of 4-5 images, as well as the general class your subject falls under. For example, the dog dataset contains images of one particular puppy, and the general class this subject falls under is
dog.- Modify the
$CLASS_NAMEand$INSTANCE_DIRenvironment variables.
- Modify the
- The
$DATA_PREFIXthat the pre-trained model is downloaded to. This directory is also where the training dataset and the fine-tuned model checkpoint are written at the end of training.- If you add more worker nodes to the cluster, you should
$DATA_PREFIXto a shared NFS filesystem such as/mnt/cluster_storage. See this doc for all the options. - Note that each run of the script will overwrite the fine-tuned model checkpoint from the previous run, so consider changing the
$DATA_PREFIXenvironment variable on each run if you don't want to lose the models/data of previous runs.
- If you add more worker nodes to the cluster, you should
- The
$NUM_WORKERSvariable sets the number of data-parallel workers used during fine-tuning. The default is 2 workers (2 workers, each using 1 GPU), and you should increase this number if you add more GPU worker nodes to the cluster. - Setting
--num_epochsand--max_train_stepsdetermines the number of fine-tuning steps to take.- Depending on the batch size and number of data-parallel workers, one epoch will run for a certain number of steps. The run will terminate when one of these values (epoch vs. total number of steps) is reached.
generate.pyis used to generate stable diffusion images after loading the model from a checkpoint. You should modify the prompt at the end to be something more interesting, rather than just a photo of your subject.- If you want to launch another fine-tuning run, you may want to run only the
python train.py ...command. Running the bash script will start from the beginning (generating another regularization dataset). - Use the following command for LoRA fine-tuning.
python train.py \
  --model_dir=$ORIG_MODEL_PATH \
  --output_dir=$TUNED_MODEL_DIR \
  --instance_images_dir=$IMAGES_OWN_DIR \
  --instance_prompt="photo of $UNIQUE_TOKEN $CLASS_NAME" \
  --class_images_dir=$IMAGES_REG_DIR \
  --class_prompt="photo of a $CLASS_NAME" \
  --train_batch_size=2 \
  --lr=1e-4 \  # Note a much higher learning rate here!
  --num_epochs=10 \
  --max_train_steps=400 \
  --num_workers $NUM_WORKERS
  --use_lora
Interact with the fine-tuned model
Generate images with a script
Use the generate.py script to generate images with a prompt. Replace the variables with the values that you used in the fine-tuning script. See run_model_flags in flags.py for a full list of available command line arguments to pass to the script.
python generate.py \
  --model_dir=$TUNED_MODEL_DIR \
  --output_dir=$IMAGES_NEW_DIR \
  --prompts="photo of a $UNIQUE_TOKEN $CLASS_NAME" \
  --num_samples_per_prompt=5
To generate images using LoRA fine-tuned model:
python generate.py \
  --model_dir=$ORIG_MODEL_PATH \
  --lora_weights_dir=$TUNED_MODEL_DIR \
  --output_dir=$IMAGES_NEW_DIR \
  --prompts="photo of a $UNIQUE_TOKEN $CLASS_NAME" \
  --num_samples_per_prompt=5
Generate images interactively in a notebook
See the playground.ipynb notebook for a more interactive way to generate images with the fine-tuned model. Click on the Jupyter icon on the workspace page and open the notebook. Note: The widgets in this notebook don't work in VS Code, so please use Jupyter!
Appendix
Advanced: Build off of this template's cluster environment
Option 1: Build a new cluster environment on Anyscale
The dreambooth/requirements.txt file lists the requirements. Feel free to modify this file to include more requirements, then follow this guide to create a new cluster environment with the anyscale CLI . Paste the requirements into the cluster environment YAML.
Finally, update the workspace's cluster environment to this environment after it's done building.
Option 2: Build a new docker image with your own infrastructure
Use the following docker pull command if you want to manually build a new Docker image based off of this one.
docker pull us-docker.pkg.dev/anyscale-workspace-templates/workspace-templates/dreambooth-finetuning:latest