# Weather MCP Server
This is a sample MCP Server in Python implementing weather tools with mock responses. It can be used as a scaffold for your own MCP Server. It includes the following features:
- **Weather Tool**: A tool that provides mocked weather information based on the given location.
- **Git Clone Tool**: A tool that clones a git repository to a specified folder.
- **VS Code Open Tool**: A tool that opens a folder in VS Code or VS Code Insiders.
- **Connect to Agent Builder**: A feature that allows you to connect the MCP server to the Agent Builder for testing and debugging.
- **Debug in [MCP Inspector](https://github.com/modelcontextprotocol/inspector)**: A feature that allows you to debug the MCP Server using the MCP Inspector.
## Get started with the Weather MCP Server template
> **Prerequisites**
>
> To run the MCP Server in your local dev machine, you will need:
>
> - [Python](https://www.python.org/)
> - [Git](https://git-scm.com/) (Required for git_clone_repo tool)
> - [VS Code](https://code.visualstudio.com/) or [VS Code Insiders](https://code.visualstudio.com/insiders/) (Required for open_in_vscode tool)
> - (*Optional - if you prefer uv*) [uv](https://github.com/astral-sh/uv)
> - [Python Debugger Extension](https://marketplace.visualstudio.com/items?itemName=ms-python.debugpy)
## Prepare environment
There are two approaches to set up the environment for this project. You can choose either one based on your preference.
> Note: Reload VSCode or terminal to ensure the virtual environment python is used after creating the virtual environment.
| Approach | Steps |
| -------- | ----- |
| Using `uv` | 1. Create virtual environment: `uv venv`
2. Run VSCode Command "***Python: Select Interpreter***" and select the python from created virtual environment
3. Install dependencies (include dev dependencies): `uv pip install -r pyproject.toml --extra dev` |
| Using `pip` | 1. Create virtual environment: `python -m venv .venv`
2. Run VSCode Command "***Python: Select Interpreter***" and select the python from created virtual environment
3. Install dependencies (include dev dependencies): `pip install -e .[dev]` |
After setting up the environment, you can run the server in your local dev machine via Agent Builder as the MCP Client to get started:
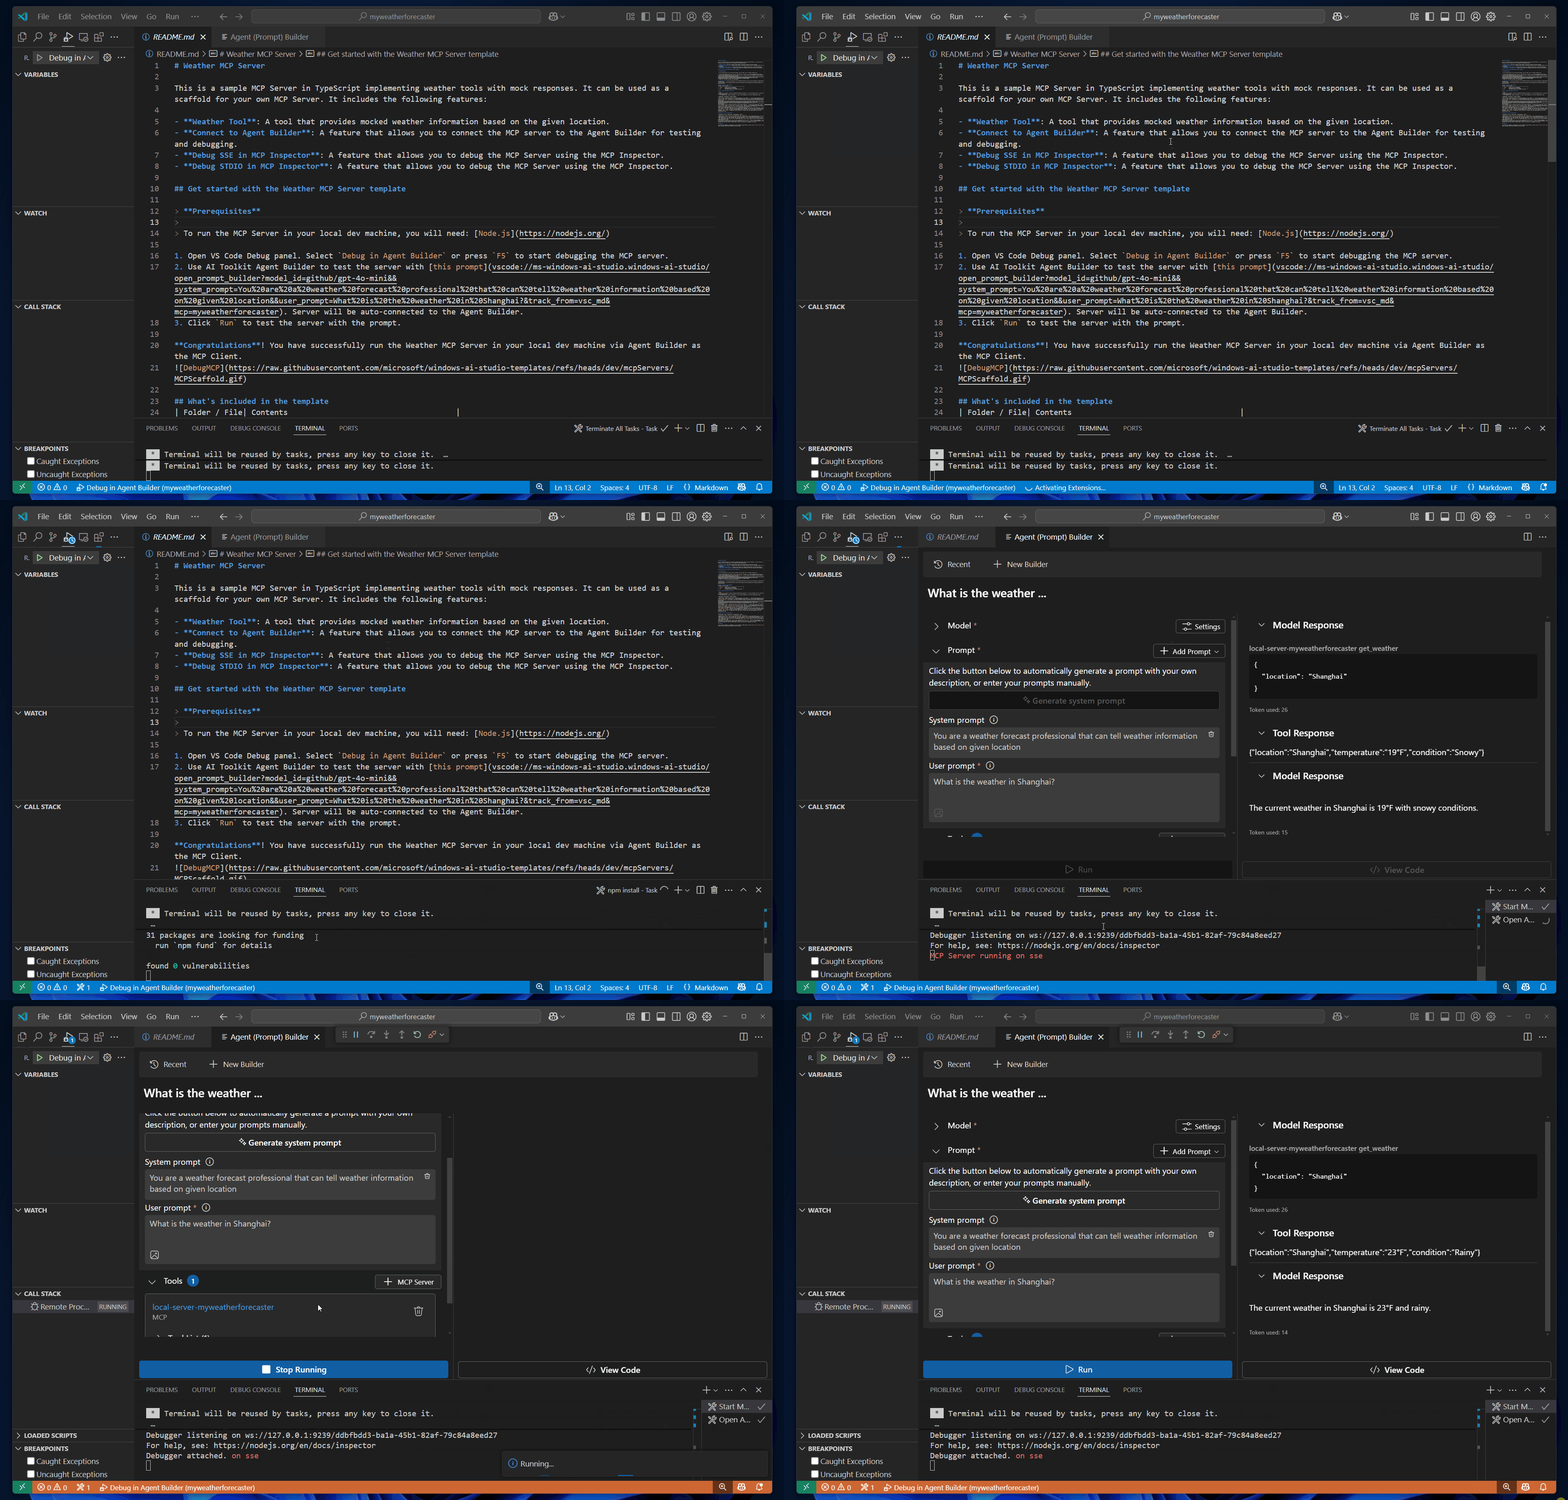
1. Open VS Code Debug panel. Select `Debug in Agent Builder` or press `F5` to start debugging the MCP server.
2. Use AI Toolkit Agent Builder to test the server with [this prompt](vscode://ms-windows-ai-studio.windows-ai-studio/open_prompt_builder?model_id=github/gpt-4.1-mini&system_prompt=You%20are%20a%20weather%20forecast%20professional%20that%20can%20tell%20weather%20information%20based%20on%20given%20location&user_prompt=What%20is%20the%20weather%20in%20Shanghai?&track_from=vsc_md&mcp=github_mcp_server). Server will be auto-connected to the Agent Builder.
3. Click `Run` to test the server with the prompt.
**Congratulations**! You have successfully run the Weather MCP Server in your local dev machine via Agent Builder as the MCP Client.
## What's included in the template
| Folder / File| Contents |
| ------------ | -------------------------------------------- |
| `.vscode` | VSCode files for debugging |
| `.aitk` | Configurations for AI Toolkit |
| `src` | The source code for the weather mcp server |
## How to debug the Weather MCP Server
> Notes:
> - [MCP Inspector](https://github.com/modelcontextprotocol/inspector) is a visual developer tool for testing and debugging MCP servers.
> - All debugging modes support breakpoints, so you can add breakpoints to the tool implementation code.
## Available Tools
### Weather Tool
The `get_weather` tool provides mocked weather information for a specified location.
| Parameter | Type | Description |
| --------- | ---- | ----------- |
| `location` | string | Location to get weather for (e.g., city name, state, or coordinates) |
### Git Clone Tool
The `git_clone_repo` tool clones a git repository to a specified folder.
| Parameter | Type | Description |
| --------- | ---- | ----------- |
| `repo_url` | string | URL of the git repository to clone |
| `target_folder` | string | Path to the folder where the repository should be cloned |
The tool returns a JSON object with:
- `success`: Boolean indicating if the operation was successful
- `target_folder` or `error`: The path of the cloned repository or an error message
### VS Code Open Tool
The `open_in_vscode` tool opens a folder in VS Code or VS Code Insiders application.
| Parameter | Type | Description |
| --------- | ---- | ----------- |
| `folder_path` | string | Path to the folder to open |
| `use_insiders` | boolean (optional) | Whether to use VS Code Insiders instead of regular VS Code |
The tool returns a JSON object with:
- `success`: Boolean indicating if the operation was successful
- `message` or `error`: A confirmation message or an error message
| Debug Mode | Description | Steps to debug |
| ---------- | ----------- | --------------- |
| Agent Builder | Debug the MCP server in the Agent Builder via AI Toolkit. | 1. Open VS Code Debug panel. Select `Debug in Agent Builder` and press `F5` to start debugging the MCP server.
2. Use AI Toolkit Agent Builder to test the server with [this prompt](vscode://ms-windows-ai-studio.windows-ai-studio/open_prompt_builder?model_id=github/gpt-4.1-mini&system_prompt=You%20are%20a%20weather%20forecast%20professional%20that%20can%20tell%20weather%20information%20based%20on%20given%20location&user_prompt=What%20is%20the%20weather%20in%20Shanghai?&track_from=vsc_md&mcp=github_mcp_server). Server will be auto-connected to the Agent Builder.
3. Click `Run` to test the server with the prompt. |
| MCP Inspector | Debug the MCP server using the MCP Inspector. | 1. Install [Node.js](https://nodejs.org/)
2. Set up Inspector: `cd inspector` && `npm install`
3. Open VS Code Debug panel. Select `Debug SSE in Inspector (Edge)` or `Debug SSE in Inspector (Chrome)`. Press F5 to start debugging.
4. When MCP Inspector launches in the browser, click the `Connect` button to connect this MCP server.
5. Then you can `List Tools`, select a tool, input parameters, and `Run Tool` to debug your server code.
|
## Default Ports and customizations
| Debug Mode | Ports | Definitions | Customizations | Note |
| ---------- | ----- | ------------ | -------------- |-------------- |
| Agent Builder | 3001 | [tasks.json](.vscode/tasks.json) | Edit [launch.json](.vscode/launch.json), [tasks.json](.vscode/tasks.json), [\_\_init\_\_.py](src/__init__.py), [mcp.json](.aitk/mcp.json) to change above ports. | N/A |
| MCP Inspector | 3001 (Server); 5173 and 3000 (Inspector) | [tasks.json](.vscode/tasks.json) | Edit [launch.json](.vscode/launch.json), [tasks.json](.vscode/tasks.json), [\_\_init\_\_.py](src/__init__.py), [mcp.json](.aitk/mcp.json) to change above ports.| N/A |
## Feedback
If you have any feedback or suggestions for this template, please open an issue on the [AI Toolkit GitHub repository](https://github.com/microsoft/vscode-ai-toolkit/issues)