 wehub-resource-sync
44 KiB
Note
本文档由 WeHub 基于上游 README 翻译整理,属于社区翻译,非官方中文文档。
English · 原始项目 · 上游 README
原作者、版权与许可证归属以原始项目及本仓库 LICENSE 文件为准。

Grounded-Segment-Anything










我们计划通过结合 Grounding DINO 与 Segment Anything,打造一个非常有趣的演示:用文本输入即可检测并分割任意目标!我们将在此基础上持续改进,并打造更多有趣的演示。我们已在 arXiv 发布了关于本项目的整体技术报告,详情请参阅 Grounded SAM: Assembling Open-World Models for Diverse Visual Tasks。
- 🔥 Grounded SAM 2 现已发布,它将 Grounding DINO 与 SAM 2 结合,可在开放世界场景中跟踪任意目标。
- 🔥 Grounding DINO 1.5 现已发布,这是 IDEA Research 能力最强的开放世界目标检测模型!
- 🔥 Grounding DINO 与 Grounded SAM 现已支持 Huggingface。为便于使用,可参考 此文档
我们非常愿意帮助每个人分享并推广基于 Segment-Anything 的新项目。更多社区中的精彩演示与作品请见:Highlight Extension Projects。你可以提交新 issue(带 project 标签)或新 pull request 来添加新项目链接。


🍄 为什么要做这个项目?
本项目的核心思路是组合不同模型的优势,构建一条非常强大的流水线以解决复杂问题。值得一提的是,这是一套组合强专家模型的工作流,其中各部分既可单独使用,也可组合使用,并可替换为任何类似但不同的模型(例如用 GLIP 或其他检测器替换 Grounding DINO / 用 ControlNet 或 GLIGEN 替换 Stable-Diffusion / 与 ChatGPT 结合)。
🍇 更新
2024/01/26我们已在 arXiv 发布关于本项目的综合技术报告,详情请参阅 Grounded SAM: Assembling Open-World Models for Diverse Visual Tasks。衷心感谢本项目所有贡献者的付出。2023/12/17支持 Grounded-RepViT-SAM 演示,非常感谢他们的出色工作!2023/12/16支持 Grounded-Edge-SAM 演示,非常感谢他们的出色工作!2023/12/10支持 Grounded-Efficient-SAM 演示,非常感谢他们的出色工作!2023/11/24发布 RAM++,,这是 RAM 的下一代版本。RAM++ 能以高精度识别任意类别,包括预定义的常见类别和多样化的开放集类别。2023/11/23发布我们新提出的视觉提示计数模型 T-Rex.。介绍视频 与 演示 现已在 DDS 提供。2023/07/25在 EfficientSAM 中支持 Light-HQ-SAM,致谢 Mingqiao Ye 与 Lei Ke,,非常感谢他们的出色工作!2023/07/14将 Grounding-DINO-B 与 SAM-HQ 结合,在 Segmentation in the Wild 竞赛零样本赛道取得 49.6 mean AP,较 Grounded-SAM 提升 3.6 mean AP,感谢他们的出色工作!2023/06/28在 EfficientSAM 中将 Grounding-DINO 与包括 FastSAM 与 MobileSAM 在内的 Efficient SAM 变体结合,以实现更快标注,非常感谢他们的出色工作!2023/06/20将 Grounding-DINO-L 与 SAM-ViT-H 结合,Grounded-SAM 在 Segmentation in the Wild 竞赛零样本赛道、CVPR 2023 workshop, 上取得 46.0 mean AP,较 UNINEXT (CVPR 2023) 提升约 4 mean AP。2023/06/16发布 RAM-Grounded-SAM Replicate Online Demo.,非常感谢 Chenxi 提供这一精彩演示 🌹。2023/06/14支持 RAM-Grounded-SAM & SAM-HQ,并更新 Simple Automatic Label Demo 以支持 RAM,,搭建强大的自动标注流水线。2023/06/13查看 Autodistill: Train YOLOv8 with ZERO Annotations 教程,了解如何使用 Grounded-SAM + Autodistill 进行自动数据标注与实时模型训练。2023/06/13在 Grounded-SAM Demo 中支持 SAM-HQ,以获得更高质量的预测。2023/06/12支持 RAM-Grounded-SAM,打造强大的自动标注流水线!感谢 Recognize-Anything.2023/06/01我们的 Grounded-SAM 已获录用,将在 ICCV 2023! 以演示形式展示。巴黎见!2023/05/23:在 ImageBind-SAM 中支持Image-Referring-Segment、Audio-Referring-Segment与Text-Referring-Segment。2023/05/03:查看 Automated Dataset Annotation and Evaluation with GroundingDINO and SAM,这是一篇关于自动标注的精彩教程!非常感谢 Piotr Skalski 与 Roboflow!
目录
- Grounded-Segment-Anything
- 安装
- Grounded-SAM 演示区
- 分步 Notebook 演示
- GroundingDINO:使用文本提示检测一切
- Grounded-SAM:使用文本提示检测并分割一切
- 带修复(Inpainting)的 Grounded-SAM:使用文本提示检测、分割并生成一切
- Grounded-SAM 与 Inpaint Gradio 应用
- Grounded-SAM 配合 RAM 或 Tag2Text 实现自动标注
- Grounded-SAM 配合 BLIP 与 ChatGPT 实现自动标注
- Grounded-SAM 配合 Whisper:使用音频检测并分割任意对象
- 配合 Visual ChatGPT 的 Grounded-SAM 聊天机器人
- Grounded-SAM 配合 OSX 实现 3D 全身网格恢复
- Grounded-SAM 配合 VISAM 实现跟踪与分割任意对象
- 交互式时尚编辑演示区:点击进行分割与编辑
- 交互式人脸编辑演示区:点击并编辑人脸
- 通过 Segment Anything 生成 3D 框
- 演示区:更多有趣且富有想象力的 Grounded-SAM 演示
- 高效 SAM 系列,加速标注
- 引用
前期工作
在尝试演示之前,这里提供一些你可能需要了解的背景知识。
| 标题 | 简介 | 描述 | 链接 |
|---|---|---|---|
| Segment-Anything |  |
一个强大的基础模型,旨在分割图像中的任意对象,需要提示(如框/点/文本)来生成掩码 | [Github] [Page] [Demo] |
| Grounding DINO |  |
一个强大的零样本检测器,能够使用自由形式文本生成高质量的框和标签。 | [Github] [Demo] |
| OSX | 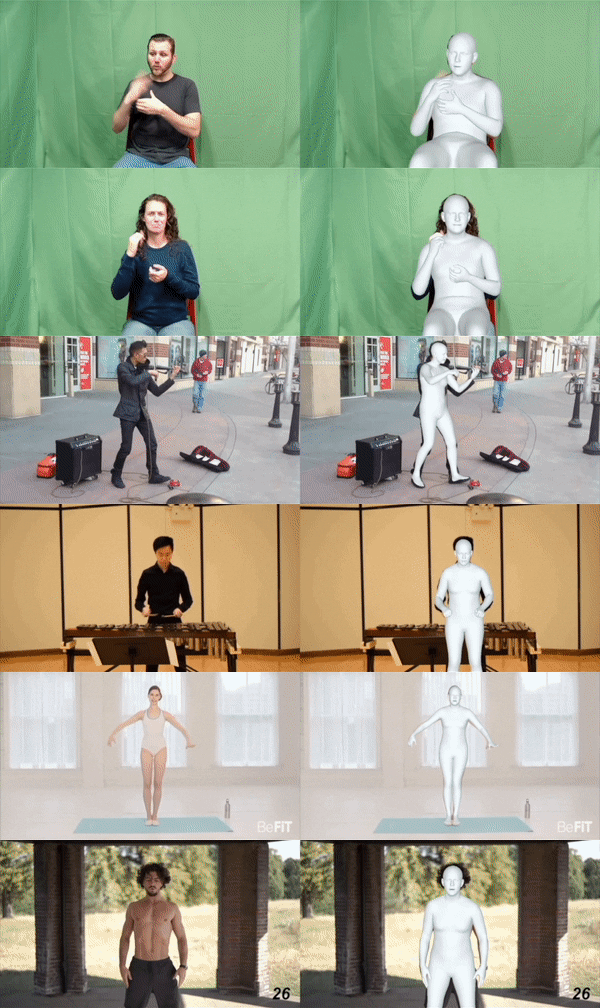 |
一种强大且高效的单阶段动作捕捉方法,可从单目图像生成高质量的 3D 人体网格。OSX 还发布了大规模上半身数据集 UBody,以在上半身场景中实现更准确的重建。 | [Github] [Page] [Video] [Data] |
| Stable-Diffusion |  |
一个超级强大的开源潜空间文本到图像扩散模型 | [Github] [Page] |
| RAM++ |  |
RAM++ 是 RAM 的下一代版本,能够以高精度识别任意类别。 | [Github] |
| RAM |  |
RAM 是一个图像标注模型,能够以高精度识别任意常见类别。 | [Github] [Demo] |
| BLIP |  |
一个出色的语言-视觉模型,用于图像理解。 | [GitHub] |
| Visual ChatGPT |  |
一个出色的工具,将 ChatGPT 与一系列视觉基础模型(Visual Foundation Models)连接起来,使聊天过程中能够发送和接收图像。 | [Github] [Demo] |
| Tag2Text |  |
一个高效且可控的视觉-语言模型,能够同时输出优质的图像描述和图像标注。 | [Github] [Demo] |
| VoxelNeXt |  |
一个简洁、简单且完全稀疏的 3D 目标检测器,直接在稀疏体素特征上预测目标。 | [Github] |
精选项目
这里提供一些你可能感兴趣的出色作品:
| 标题 | 描述 | 链接 |
|---|---|---|
| Semantic-SAM | 一个通用图像分割模型,可在任意所需粒度下分割并识别任意对象 | [Github] [Demo] |
| SEEM: Segment Everything Everywhere All at Once | 一个强大的可提示分割模型,支持使用多种类型的提示(文本、点、涂鸦、参考图像等)及其任意组合进行分割。 | [Github] [Demo] |
| OpenSeeD | 一个用于开放词汇分割与检测的简单框架,支持通过框输入进行交互式分割以生成掩码 | [Github] |
| LLaVA | 基于 GPT-4 的视觉指令微调 | [Github] [Page] [Demo] [Data] [Model] |
| GenSAM | 通过无需训练的测试时自适应,放宽 SAM 中对实例特定手工提示的要求 | [Github] [Page] |
我们还在此列出一些你可能感兴趣的出色 Segment Anything 扩展项目:
- Computer Vision in the Wild (CVinW) Readings 适合对计算机视觉中开放集(open-set)任务感兴趣的用户。
- Zero-Shot Anomaly Detection by Yunkang Cao
- EditAnything: ControlNet + StableDiffusion based on the SAM segmentation mask by Shanghua Gao and Pan Zhou
- IEA: Image Editing Anything by Zhengcong Fei
- SAM-MMRorate: Combining Rotated Object Detector and SAM by Qingyun Li and Xue Yang
- Awesome-Anything by Gongfan Fang
- Prompt-Segment-Anything by Rockey
- WebUI for Segment-Anything and Grounded-SAM by Chengsong Zhang
- Inpainting Anything: Inpaint Anything with SAM + Inpainting models by Tao Yu
- Grounded Segment Anything From Objects to Parts: Combining Segment-Anything with VLPart & GLIP & Visual ChatGPT by Peize Sun and Shoufa Chen
- Narapi-SAM: Integration of Segment Anything into Narapi (A nice viewer for SAM) by MIC-DKFZ
- Grounded Segment Anything Colab by camenduru
- Optical Character Recognition with Segment Anything by Zhenhua Yang
- Transform Image into Unique Paragraph with ChatGPT, BLIP2, OFA, GRIT, Segment Anything, ControlNet by showlab
- Lang-Segment-Anything: Another awesome demo for combining GroundingDINO with Segment-Anything by Luca Medeiros
- 🥳 🚀 Playground: Integrate SAM and OpenMMLab!
- 3D-object via Segment Anything by Yukang Chen
- Image2Paragraph: Transform Image Into Unique Paragraph by Show Lab
- Zero-shot Scene Graph Generate with Grounded-SAM by JackWhite-rwx
- CLIP Surgery for Better Explainability with Enhancement in Open-Vocabulary Tasks by Eli-YiLi
- Panoptic-Segment-Anything: Zero-shot panoptic segmentation using SAM by segments-ai
- Caption-Anything: Generates Descriptive Captions for Any Object within an Image by Teng Wang
- Segment-Anything-3D: Transferring Segmentation Information of 2D Images to 3D Space by Yunhan Yang
- Expediting SAM without Fine-tuning by Weicong Liang and Yuhui Yuan
- Semantic Segment Anything: Providing Rich Semantic Category Annotations for SAM by Jiaqi Chen and Zeyu Yang and Li Zhang
- Enhance Everything: Combining SAM with Image Restoration and Enhancement Tasks by Xin Li
- DragGAN by Shanghai AI Lab.
- Tabletop HandyBot: Robotic arm assistant that performs tabletop tasks using Grounded-SAM by Yifei Cheng
安装
代码需要 python>=3.8,以及 pytorch>=1.7 和 torchvision>=0.8。请按照此处 的说明安装 PyTorch 和 TorchVision 依赖。强烈建议安装支持 CUDA 的 PyTorch 和 TorchVision。
使用 Docker 安装
打开一个终端:
make build-image
make run
就这样。
如果你希望跨 Docker 容器进行可视化,请打开另一个终端并输入:
xhost +
不使用 Docker 安装
如果你想为 Grounded-SAM 构建本地 GPU 环境,应按如下方式手动设置环境变量:
export AM_I_DOCKER=False
export BUILD_WITH_CUDA=True
export CUDA_HOME=/path/to/cuda-11.3/
安装 Segment Anything:
python -m pip install -e segment_anything
安装 Grounding DINO:
pip install --no-build-isolation -e GroundingDINO
安装 diffusers:
pip install --upgrade diffusers[torch]
安装 osx:
git submodule update --init --recursive
cd grounded-sam-osx && bash install.sh
安装 RAM 与 Tag2Text:
git clone https://github.com/xinyu1205/recognize-anything.git
pip install -r ./recognize-anything/requirements.txt
pip install -e ./recognize-anything/
以下可选依赖项对于掩码后处理、以 COCO 格式保存掩码、示例 notebook 以及以 ONNX 格式导出模型是必需的。运行示例 notebook 还需要 jupyter。
pip install opencv-python pycocotools matplotlib onnxruntime onnx ipykernel
更多详情请参阅 install segment anything 和 install GroundingDINO 以及 install OSX
Grounded-SAM Playground
让我们开始探索 Grounded-SAM Playground,未来我们还会发布更多有趣的演示,敬请期待!
📖 分步 Notebook 演示
此处列出本项目提供的一些 notebook 演示:
🏃♂️ GroundingDINO:用文本提示检测一切
🍇 [arXiv Paper] 🌹[Try the Colab Demo] 🌻 [Try Huggingface Demo] 🍄 [Automated Dataset Annotation and Evaluation]
以下是运行 GroundingDINO 演示的分步教程:
步骤 1:下载预训练权重
cd Grounded-Segment-Anything

# download the pretrained groundingdino-swin-tiny model
wget https://github.com/IDEA-Research/GroundingDINO/releases/download/v0.1.0-alpha/groundingdino_swint_ogc.pth
步骤 2:运行演示
python grounding_dino_demo.py
使用 Python 运行(与演示相同,但在安装 GroundingDINO 后可在任意位置运行)
from groundingdino.util.inference import load_model, load_image, predict, annotate
import cv2

model = load_model("GroundingDINO/groundingdino/config/GroundingDINO_SwinT_OGC.py", "./groundingdino_swint_ogc.pth")
IMAGE_PATH = "assets/demo1.jpg"
TEXT_PROMPT = "bear."
BOX_THRESHOLD = 0.35
TEXT_THRESHOLD = 0.25

image_source, image = load_image(IMAGE_PATH)

boxes, logits, phrases = predict(
    model=model,
    image=image,
    caption=TEXT_PROMPT,
    box_threshold=BOX_THRESHOLD,
    text_threshold=TEXT_THRESHOLD
)

annotated_frame = annotate(image_source=image_source, boxes=boxes, logits=logits, phrases=phrases)
cv2.imwrite("annotated_image.jpg", annotated_frame)
提示
- 如果你想使用 Grounding DINO, 在一句话中检测多个对象,我们建议用
.分隔每个名称。示例:cat . dog . chair .
步骤 3:查看标注图像
标注图像将保存为 ./annotated_image.jpg。
| 文本提示词 | 示例图像 | 标注图像 |
|---|---|---|
Bear. |
 |
 |
Horse. Clouds. Grasses. Sky. Hill |
 |
 |
🏃♂️ Grounded-SAM:使用文本提示词检测并分割一切
以下是运行 Grounded-SAM 演示的分步教程:
步骤 1:下载预训练权重
cd Grounded-Segment-Anything

wget https://dl.fbaipublicfiles.com/segment_anything/sam_vit_h_4b8939.pth
wget https://github.com/IDEA-Research/GroundingDINO/releases/download/v0.1.0-alpha/groundingdino_swint_ogc.pth
我们在此提供两个版本的 Grounded-SAM 演示:
- grounded_sam_demo.py:Grounded-SAM 的原始实现。
- grounded_sam_simple_demo.py 我们更新后的、更简洁的 Grounded-SAM 版本。
步骤 2:运行原始 grounded-sam 演示
# depends on your device
export CUDA_VISIBLE_DEVICES=0
python grounded_sam_demo.py \
  --config GroundingDINO/groundingdino/config/GroundingDINO_SwinT_OGC.py \
  --grounded_checkpoint groundingdino_swint_ogc.pth \
  --sam_checkpoint sam_vit_h_4b8939.pth \
  --input_image assets/demo1.jpg \
  --output_dir "outputs" \
  --box_threshold 0.3 \
  --text_threshold 0.25 \
  --text_prompt "bear" \
  --device "cuda"
标注结果将按如下方式保存至 ./outputs
| 输入图像 | 标注图像 | 生成的掩码 |
|---|---|---|
|
 |
 |
步骤 3:使用 sam-hq 运行 grounded-sam 演示
- 下载演示图像
wget https://github.com/IDEA-Research/detrex-storage/releases/download/grounded-sam-storage/sam_hq_demo_image.png
-
在此下载 SAM-HQ 检查点 here
-
按如下方式运行 grounded-sam-hq 演示:
export CUDA_VISIBLE_DEVICES=0
python grounded_sam_demo.py \
  --config GroundingDINO/groundingdino/config/GroundingDINO_SwinT_OGC.py \
  --grounded_checkpoint groundingdino_swint_ogc.pth \
  --sam_hq_checkpoint ./sam_hq_vit_h.pth \  # path to sam-hq checkpoint
  --use_sam_hq \  # set to use sam-hq model
  --input_image sam_hq_demo_image.png \
  --output_dir "outputs" \
  --box_threshold 0.3 \
  --text_threshold 0.25 \
  --text_prompt "chair." \
  --device "cuda"
标注结果将按如下方式保存至 ./outputs
| 输入图像 | SAM 输出 | SAM-HQ 输出 |
|---|---|---|
 |
 |
 |
步骤 4:运行更新版 grounded-sam 演示(可选)
请注意,此演示与原始演示几乎相同,但代码更简洁。
python grounded_sam_simple_demo.py
标注结果将保存为 ./groundingdino_annotated_image.jpg 和 ./grounded_sam_annotated_image.jpg
| 文本提示词 | 输入图像 | GroundingDINO 标注图像 | Grounded-SAM 标注图像 |
|---|---|---|---|
The running dog |
 |
 |
 |
Horse. Clouds. Grasses. Sky. Hill |
|
 |
 |
步骤 5:在多 GPU 上运行 Sam 模型
export CUDA_VISIBLE_DEVICES=0,1
python grounded_sam_multi_gpu_demo.py \
  --config GroundingDINO/groundingdino/config/GroundingDINO_SwinT_OGC.py \
  --grounded_checkpoint groundingdino_swint_ogc.pth \
  --sam_checkpoint sam_vit_h_4b8939.pth \
  --input_path assets/car \
  --output_dir "outputs" \
  --box_threshold 0.3 \
  --text_threshold 0.25 \
  --text_prompt "car" \
  --device "cuda"
你会看到每个 GPU 各加载一次模型 
⛷️ 带修复(Inpainting)的 Grounded-SAM:使用文本提示词检测、分割并生成一切
步骤 1:下载预训练权重
cd Grounded-Segment-Anything

wget https://dl.fbaipublicfiles.com/segment_anything/sam_vit_h_4b8939.pth
wget https://github.com/IDEA-Research/GroundingDINO/releases/download/v0.1.0-alpha/groundingdino_swint_ogc.pth
步骤 2:运行 grounded-sam 修复演示
CUDA_VISIBLE_DEVICES=0
python grounded_sam_inpainting_demo.py \
  --config GroundingDINO/groundingdino/config/GroundingDINO_SwinT_OGC.py \
  --grounded_checkpoint groundingdino_swint_ogc.pth \
  --sam_checkpoint sam_vit_h_4b8939.pth \
  --input_image assets/inpaint_demo.jpg \
  --output_dir "outputs" \
  --box_threshold 0.3 \
  --text_threshold 0.25 \
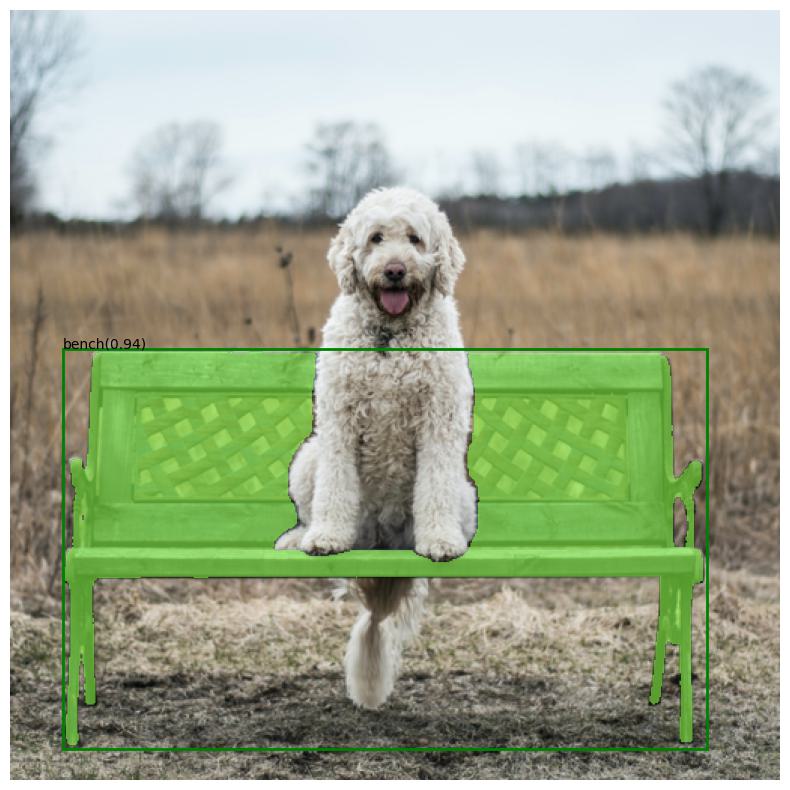
  --det_prompt "bench" \
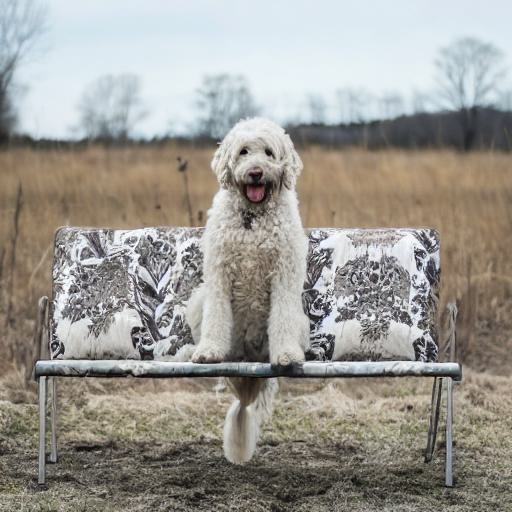
  --inpaint_prompt "A sofa, high quality, detailed" \
  --device "cuda"
标注图像和修复图像将保存至 ./outputs
步骤 3:查看结果
| 输入图像 | 检测提示词 | 标注图像 | 修复提示词 | 修复图像 |
|---|---|---|---|---|
 |
Bench |
 |
A sofa, high quality, detailed |
 |
🏌️ Grounded-SAM 与修复 Gradio 应用
本地 Gradio 应用支持 6 种任务:
- scribble:通过 Segment Anything 与鼠标点击交互实现分割(需用鼠标点击目标对象,无需指定提示词)。
- automask:通过 Segment Anything 一次性分割整张图像(无需指定提示词)。
- det:通过 Grounding DINO 与文本交互实现检测(需指定文本提示词)。
- seg:结合 Grounding DINO 与 Segment Anything,通过文本交互实现检测 + 分割(需指定文本提示词)。
- inpainting:结合 Grounding DINO + Segment Anything + Stable Diffusion,实现文本替换并替换目标对象(需指定文本提示词和修复提示词)。
- automatic:结合 BLIP + Grounding DINO + Segment Anything,实现无需交互的检测 + 分割(无需指定提示词)。
python gradio_app.py
- gradio_app 可视化效果如下:

🏷️ 结合 RAM 或 Tag2Text 的 Grounded-SAM 自动标注
Recognize Anything Models(识别一切模型) 是一系列开源且强大的基础图像识别模型,包括 RAM++, RAM 和 Tag2text.
可与 Grounded-SAM 无缝衔接,按如下步骤自动生成伪标签:
- 使用 RAM/Tag2Text 生成标签。
- 使用 Grounded-Segment-Anything 生成边界框和掩码。
步骤 1:初始化子模块并下载预训练检查点
- 初始化子模块:
cd Grounded-Segment-Anything
git submodule init
git submodule update
- 下载
GroundingDINO、SAM和RAM/Tag2Text的预训练权重:
wget https://dl.fbaipublicfiles.com/segment_anything/sam_vit_h_4b8939.pth
wget https://github.com/IDEA-Research/GroundingDINO/releases/download/v0.1.0-alpha/groundingdino_swint_ogc.pth


wget https://huggingface.co/spaces/xinyu1205/Tag2Text/resolve/main/ram_swin_large_14m.pth
wget https://huggingface.co/spaces/xinyu1205/Tag2Text/resolve/main/tag2text_swin_14m.pth
步骤 2:使用 RAM 运行演示
export CUDA_VISIBLE_DEVICES=0
python automatic_label_ram_demo.py \
  --config GroundingDINO/groundingdino/config/GroundingDINO_SwinT_OGC.py \
  --ram_checkpoint ram_swin_large_14m.pth \
  --grounded_checkpoint groundingdino_swint_ogc.pth \
  --sam_checkpoint sam_vit_h_4b8939.pth \
  --input_image assets/demo9.jpg \
  --output_dir "outputs" \
  --box_threshold 0.25 \
  --text_threshold 0.2 \
  --iou_threshold 0.5 \
  --device "cuda"
步骤 2:或使用 Tag2Text 运行演示
export CUDA_VISIBLE_DEVICES=0
python automatic_label_tag2text_demo.py \
  --config GroundingDINO/groundingdino/config/GroundingDINO_SwinT_OGC.py \
  --tag2text_checkpoint tag2text_swin_14m.pth \
  --grounded_checkpoint groundingdino_swint_ogc.pth \
  --sam_checkpoint sam_vit_h_4b8939.pth \
  --input_image assets/demo9.jpg \
  --output_dir "outputs" \
  --box_threshold 0.25 \
  --text_threshold 0.2 \
  --iou_threshold 0.5 \
  --device "cuda"
- RAM++ 显著提升了 RAM 的开放集(open-set)能力,关于对未见类别进行 RAM++ 推理.
- Tag2Text 同样提供强大的图像描述(captioning)能力,带描述文本的流程可参考 BLIP。
- 伪标签与模型预测可视化结果将保存在
output_dir,如下所示(右图):

🤖 使用 BLIP 的 Grounded-SAM 自动标注
可以按如下方式轻松自动生成伪标签:
- 使用 BLIP(或其他描述模型)生成图像描述。
- 从描述中提取标签。我们使用 ChatGPT 处理可能较复杂的句子。
- 使用 Grounded-Segment-Anything 生成边界框和掩码。
- 运行 Demo
export OPENAI_API_KEY=your_openai_key
export OPENAI_API_BASE=https://closeai.deno.dev/v1
export CUDA_VISIBLE_DEVICES=0
python automatic_label_demo.py \
  --config GroundingDINO/groundingdino/config/GroundingDINO_SwinT_OGC.py \
  --grounded_checkpoint groundingdino_swint_ogc.pth \
  --sam_checkpoint sam_vit_h_4b8939.pth \
  --input_image assets/demo3.jpg \
  --output_dir "outputs" \
  --openai_key $OPENAI_API_KEY \
  --box_threshold 0.25 \
  --text_threshold 0.2 \
  --iou_threshold 0.5 \
  --device "cuda"
- 如果你没有 ChatGPT 付费账号,也可以使用 NLTK。启动 Demo 时只需不包含
openai_key参数即可。- 脚本会自动下载所需的 NLTK 数据。
- 伪标签与模型预测可视化结果将保存在
output_dir,如下所示:

😮 使用 Whisper 的 Grounded-SAM:用音频检测并分割任意目标
用语音检测并分割任意目标!

安装 Whisper
pip install -U openai-whisper
若对安装有其他问题,请参阅 Whisper 官方页面
运行语音转标签 Demo
可选:下载演示音频文件
wget https://huggingface.co/ShilongLiu/GroundingDINO/resolve/main/demo_audio.mp3
export CUDA_VISIBLE_DEVICES=0
python grounded_sam_whisper_demo.py \
  --config GroundingDINO/groundingdino/config/GroundingDINO_SwinT_OGC.py \
  --grounded_checkpoint groundingdino_swint_ogc.pth \
  --sam_checkpoint sam_vit_h_4b8939.pth \
  --input_image assets/demo4.jpg \
  --output_dir "outputs" \
  --box_threshold 0.3 \
  --text_threshold 0.25 \
  --speech_file "demo_audio.mp3" \
  --device "cuda"

运行语音转修复(inpaint)Demo
你可以启用 ChatGPT,通过 --enable_chatgpt 自动检测目标及修复顺序。
或者,你可以指定要修复的目标 [保存在 args.det_speech_file] 以及用于修复的文本 [保存在 args.inpaint_speech_file]。
export OPENAI_API_KEY=your_openai_key
export OPENAI_API_BASE=https://closeai.deno.dev/v1
# Example: enable chatgpt
export CUDA_VISIBLE_DEVICES=0
python grounded_sam_whisper_inpainting_demo.py \
  --config GroundingDINO/groundingdino/config/GroundingDINO_SwinT_OGC.py \
  --grounded_checkpoint groundingdino_swint_ogc.pth \
  --sam_checkpoint sam_vit_h_4b8939.pth \
  --input_image assets/inpaint_demo.jpg \
  --output_dir "outputs" \
  --box_threshold 0.3 \
  --text_threshold 0.25 \
  --prompt_speech_file assets/acoustics/prompt_speech_file.mp3 \
  --enable_chatgpt \
  --openai_key $OPENAI_API_KEY\
  --device "cuda"
# Example: without chatgpt
export CUDA_VISIBLE_DEVICES=0
python grounded_sam_whisper_inpainting_demo.py \
  --config GroundingDINO/groundingdino/config/GroundingDINO_SwinT_OGC.py \
  --grounded_checkpoint groundingdino_swint_ogc.pth \
  --sam_checkpoint sam_vit_h_4b8939.pth \
  --input_image assets/inpaint_demo.jpg \
  --output_dir "outputs" \
  --box_threshold 0.3 \
  --text_threshold 0.25 \
  --det_speech_file "assets/acoustics/det_voice.mp3" \
  --inpaint_speech_file "assets/acoustics/inpaint_voice.mp3" \
  --device "cuda"

💬 Grounded-SAM ChatBot 演示
参考 Visual ChatGPT,,我们为项目添加了 ChatBot。目前支持:
- "描述这张图像。"
- "检测图像中的狗(和猫)。"
- "分割图像中的任意目标。"
- "分割图像中的狗(和猫)。"
- "帮我标注这张图像。"
- "将图像中的狗替换为猫。"
使用 ChatBot:
- 若要以音频作为输入,请安装 Whisper。
- 在工具
Grounded_dino_sam_inpainting中设置默认模型配置。 - 运行 Demo
export OPENAI_API_KEY=your_openai_key
export OPENAI_API_BASE=https://closeai.deno.dev/v1
export CUDA_VISIBLE_DEVICES=0
python chatbot.py
🕺 运行 Grounded-Segment-Anything + OSX 演示

-
从此处 下载 OSX 所需的检查点
osx_l_wo_decoder.pth.tar: -
按照 OSX. 的说明下载人体模型文件,并放入
grounded-sam-osx/utils/human_model_files -
运行 Demo
export CUDA_VISIBLE_DEVICES=0
python grounded_sam_osx_demo.py \
  --config GroundingDINO/groundingdino/config/GroundingDINO_SwinT_OGC.py \
  --grounded_checkpoint groundingdino_swint_ogc.pth \
  --sam_checkpoint sam_vit_h_4b8939.pth \
  --osx_checkpoint osx_l_wo_decoder.pth.tar \
  --input_image assets/osx/grounded_sam_osx_demo.png \
  --output_dir "outputs" \
  --box_threshold 0.3 \
  --text_threshold 0.25 \
  --text_prompt "humans, chairs" \
  --device "cuda"
- 模型预测可视化结果将保存在
output_dir,如下所示:

- 我们还支持可提示的 3D 全身网格恢复。例如,你可以用文本提示跟踪某人,并估计其 3D 姿态与体型:
 |
|---|
| 穿着粉色衣服的人 |
 |
|---|
| 戴着太阳镜的男人 |
🕺 运行 Grounded-Segment-Anything + VISAM 演示
-
从 此处 for MOTRv2: 下载 checkpoint
motrv2_dancetrack.pth -
若对安装还有其他问题,请参阅更多信息。
-
运行演示
export CUDA_VISIBLE_DEVICES=0
python grounded_sam_visam.py \
  --meta_arch motr \
  --dataset_file e2e_dance \
  --with_box_refine \
  --query_interaction_layer QIMv2 \
  --num_queries 10 \
  --det_db det_db_motrv2.json \
  --use_checkpoint \
  --mot_path your_data_path \
  --resume motrv2_dancetrack.pth \
  --sam_checkpoint sam_vit_h_4b8939.pth \
  --video_path DanceTrack/test/dancetrack0003
|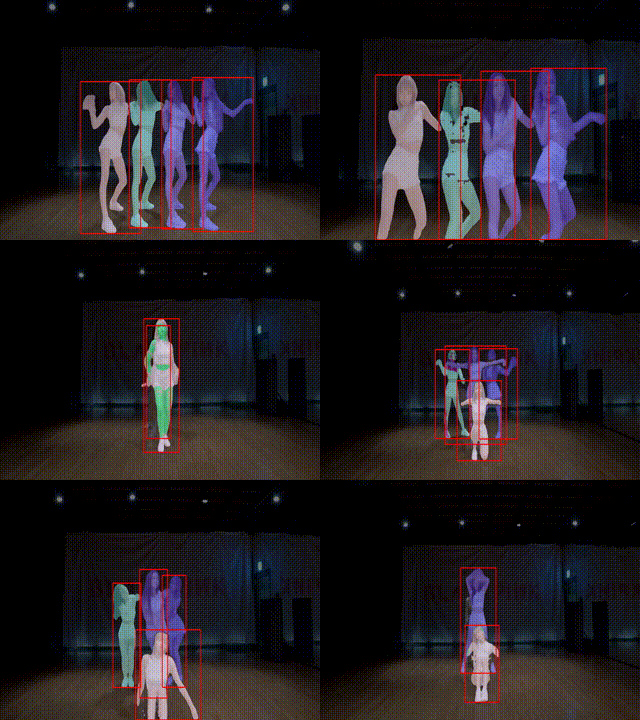 |
|
👯 交互式编辑
-
交互式时尚编辑 playground 已发布,见 此处. 在 notebook 中运行,只需点击即可标注点以进行进一步分割。尽情体验吧!
-
人脸编辑分支已发布,见 此处. 我们将持续为该分支更新更多有趣功能。以下是一些示例:

📷 基于 Segment Anything 的 3D 框
我们通过结合 Segment Anything 与 VoxelNeXt. 将应用范围扩展到 3D 世界。当我们提供提示(例如点 / 框)时,结果不仅是 2D 分割掩码(segmentation mask),还包括 3D 框。更多细节请查看 voxelnext_3d_box。


💘 致谢
贡献者
没有这些优秀人士的贡献,我们的项目不可能实现!感谢大家让本项目变得更好。
引用
若觉得本项目对你的研究有帮助,请考虑引用以下 BibTeX 条目。
@article{kirillov2023segany,
  title={Segment Anything},
  author={Kirillov, Alexander and Mintun, Eric and Ravi, Nikhila and Mao, Hanzi and Rolland, Chloe and Gustafson, Laura and Xiao, Tete and Whitehead, Spencer and Berg, Alexander C. and Lo, Wan-Yen and Doll{\'a}r, Piotr and Girshick, Ross},
  journal={arXiv:2304.02643},
  year={2023}
}

@article{liu2023grounding,
  title={Grounding dino: Marrying dino with grounded pre-training for open-set object detection},
  author={Liu, Shilong and Zeng, Zhaoyang and Ren, Tianhe and Li, Feng and Zhang, Hao and Yang, Jie and Li, Chunyuan and Yang, Jianwei and Su, Hang and Zhu, Jun and others},
  journal={arXiv preprint arXiv:2303.05499},
  year={2023}
}

@misc{ren2024grounded,
      title={Grounded SAM: Assembling Open-World Models for Diverse Visual Tasks},
      author={Tianhe Ren and Shilong Liu and Ailing Zeng and Jing Lin and Kunchang Li and He Cao and Jiayu Chen and Xinyu Huang and Yukang Chen and Feng Yan and Zhaoyang Zeng and Hao Zhang and Feng Li and Jie Yang and Hongyang Li and Qing Jiang and Lei Zhang},
      year={2024},
      eprint={2401.14159},
      archivePrefix={arXiv},
      primaryClass={cs.CV}
}